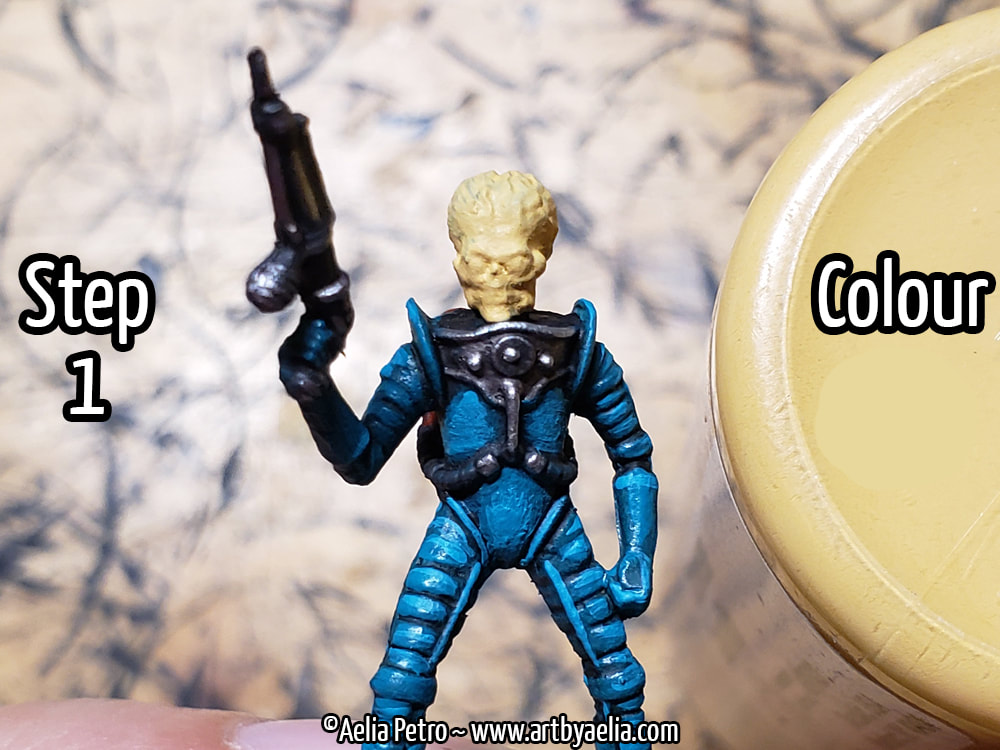
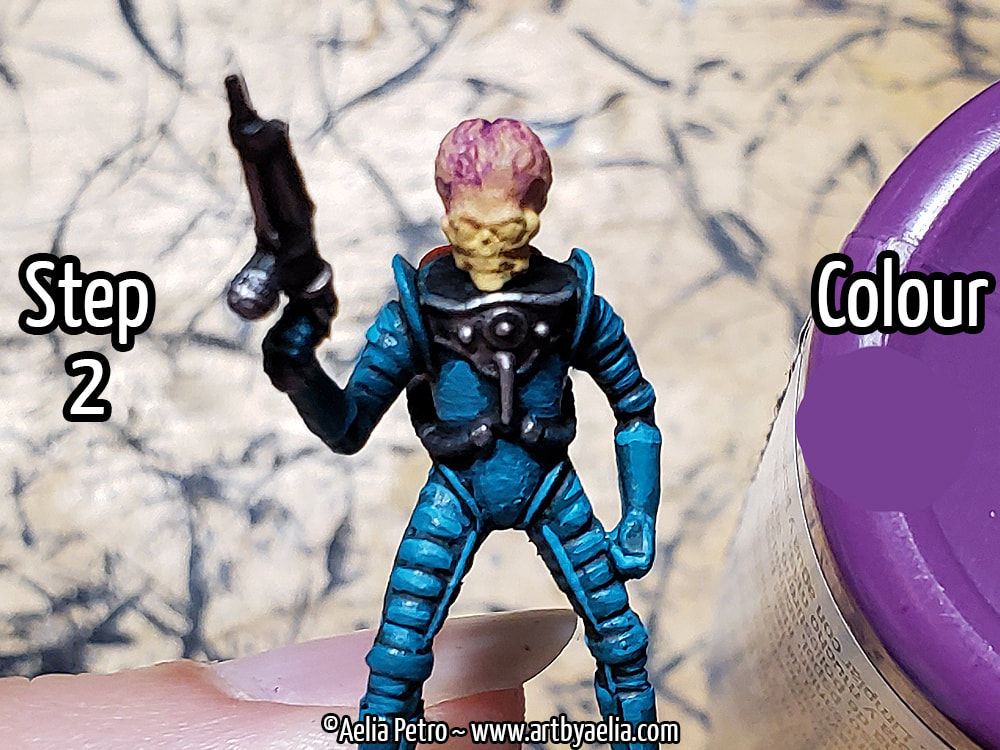
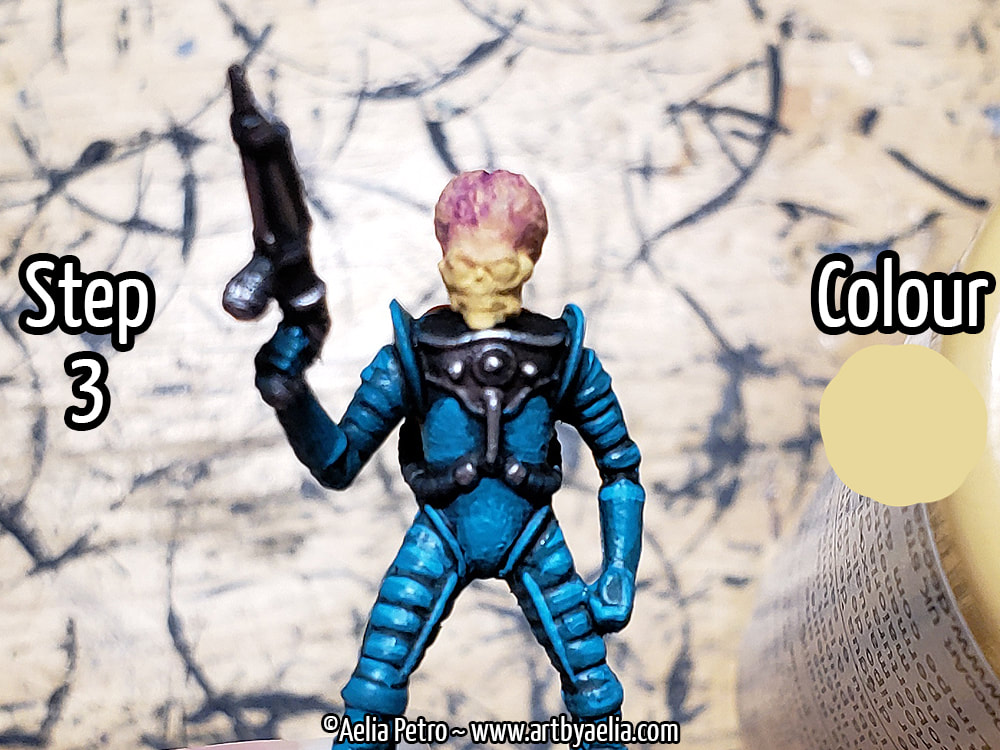
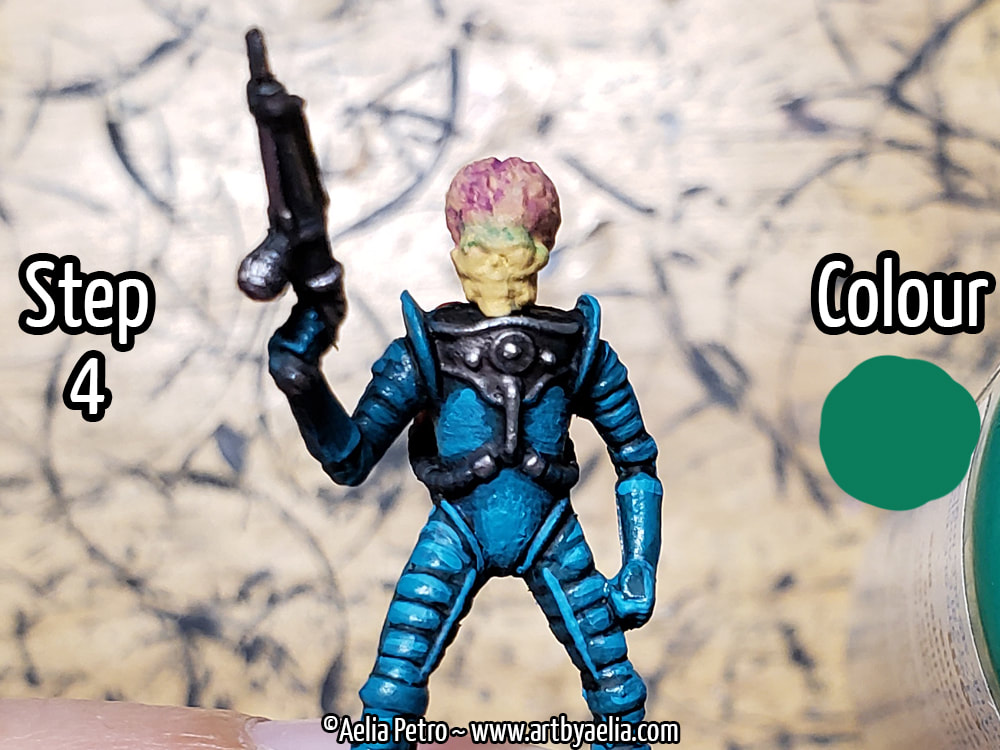
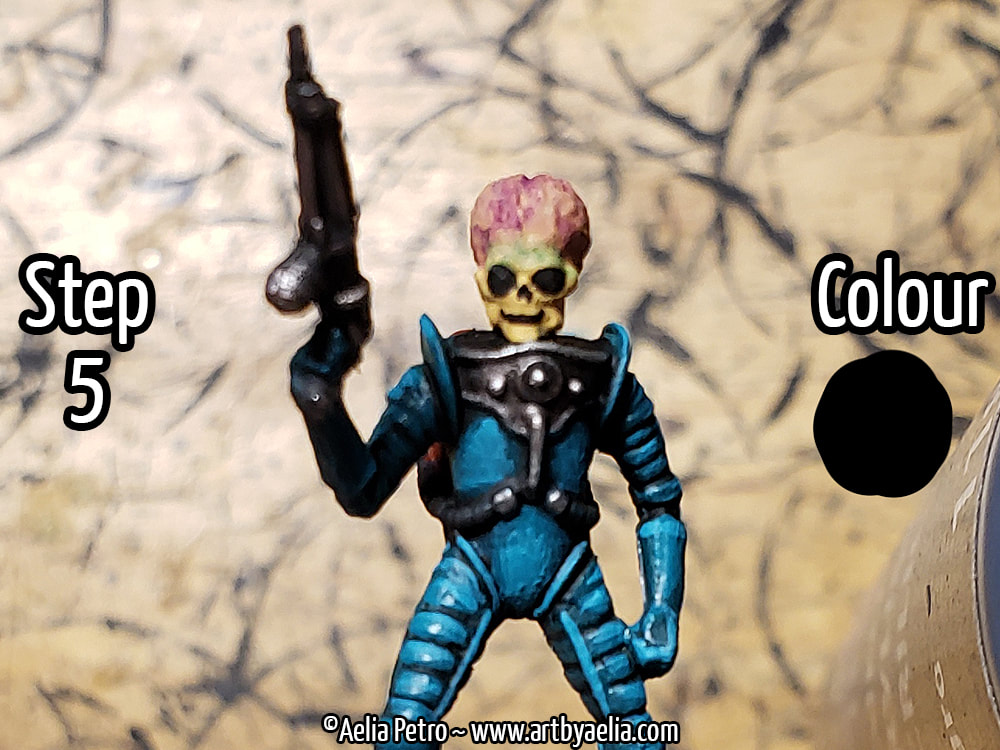
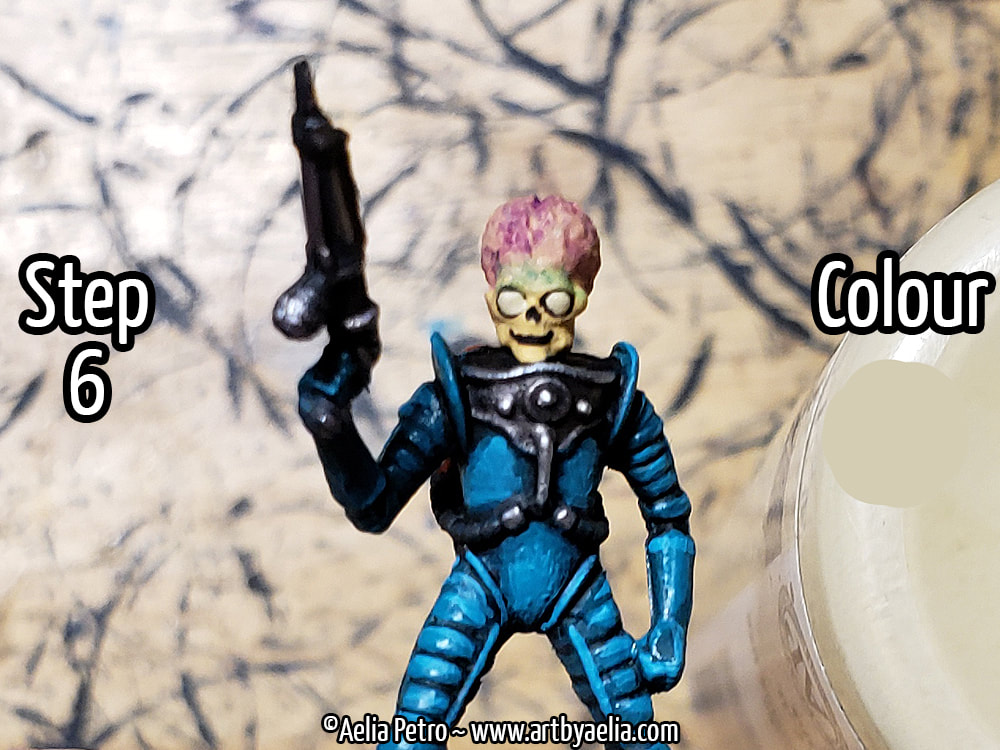
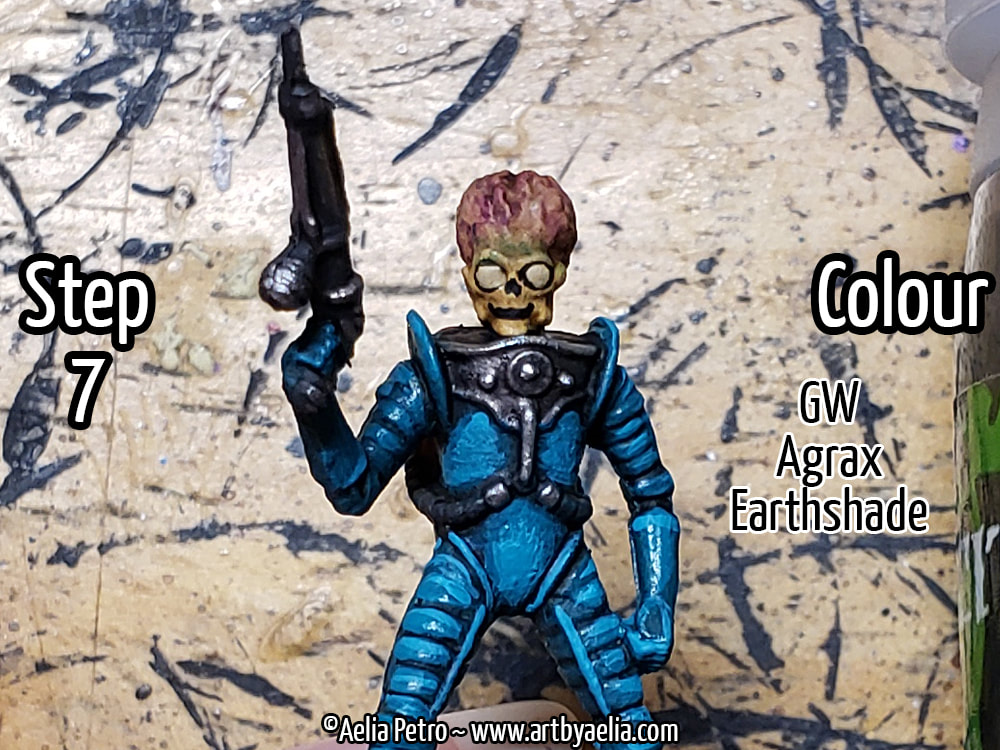
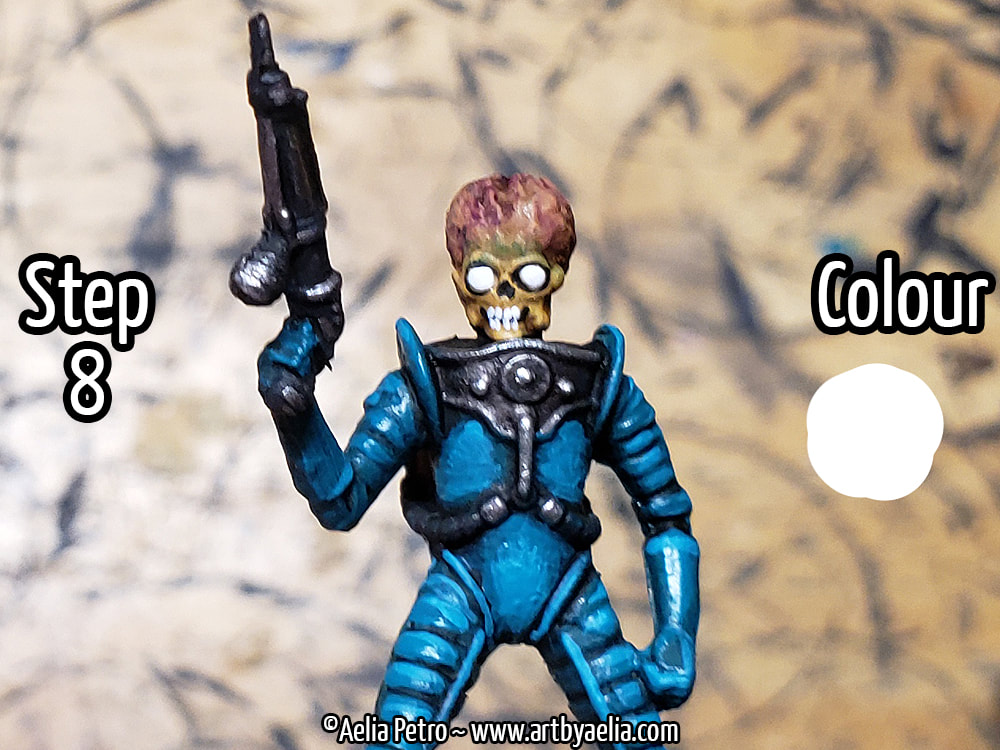
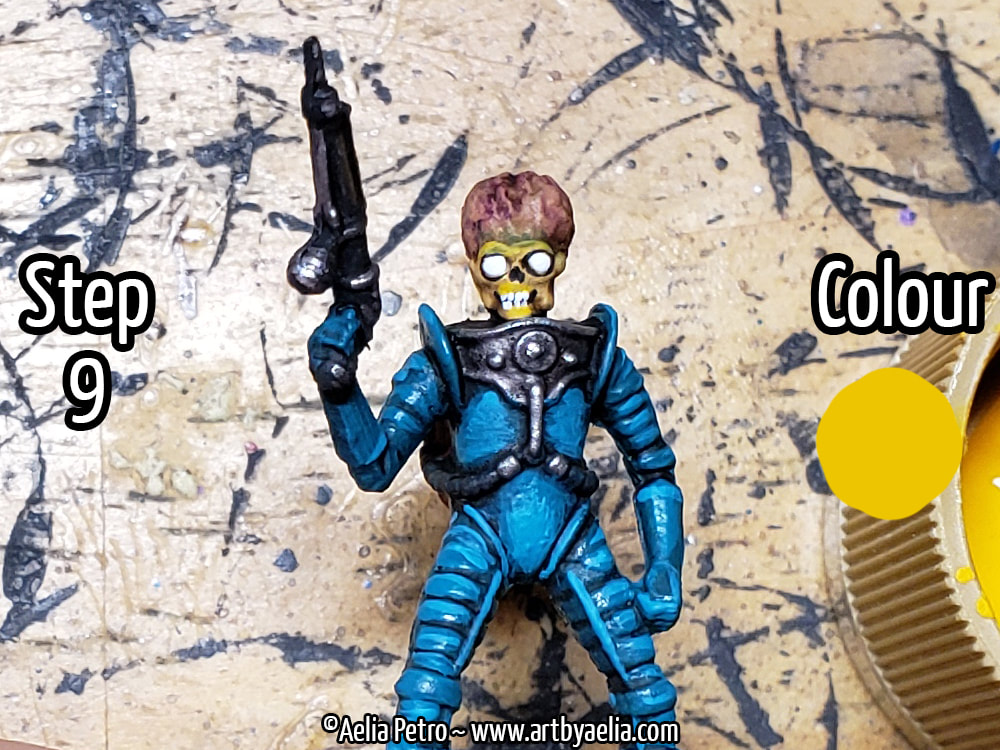
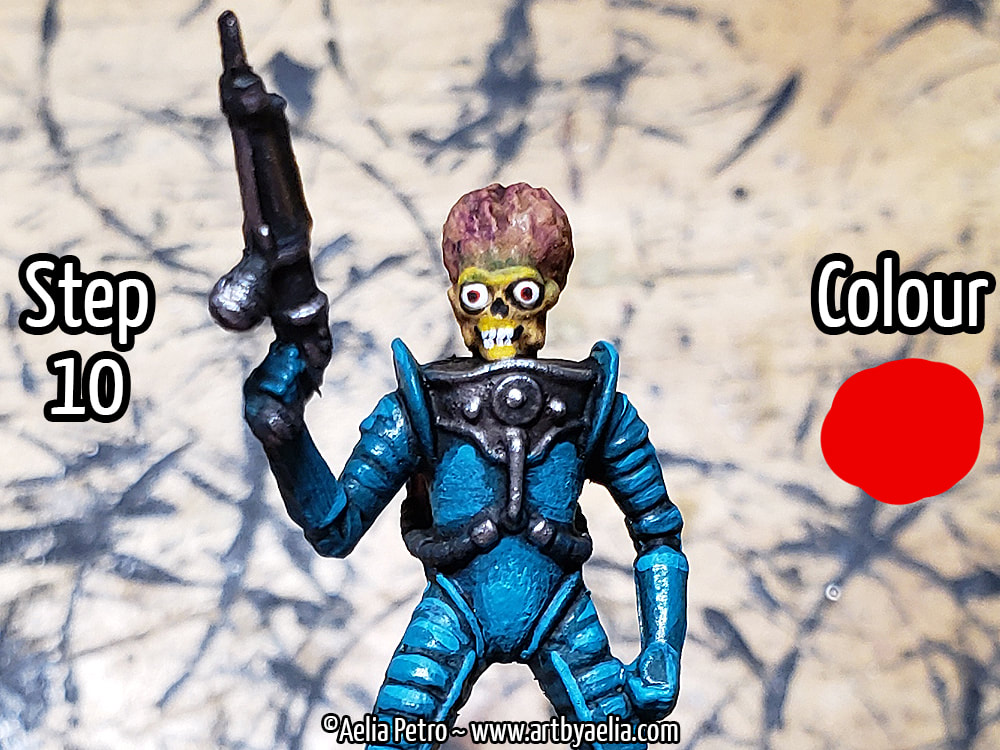
Aka: Painting Mars Attacks Martian Grunt Heads I recently got into the Mantic Mars Attacks Miniatures Game. Poor timing on my part since the game has been out of production for some time, making much of it difficult to come by. I was able to get my hands on a used copy of the base game, and have been having a lot of fun painting the martian grunts. Here's a look at the process I used to get a look close to the martians in the movie (which are deceptively complicated).
That's all there is to it! If you're feeling fancy, a dot of gloss varnish on the eyes will make them pop, but it'll be less noticeable if you've got the helmet domes for them. 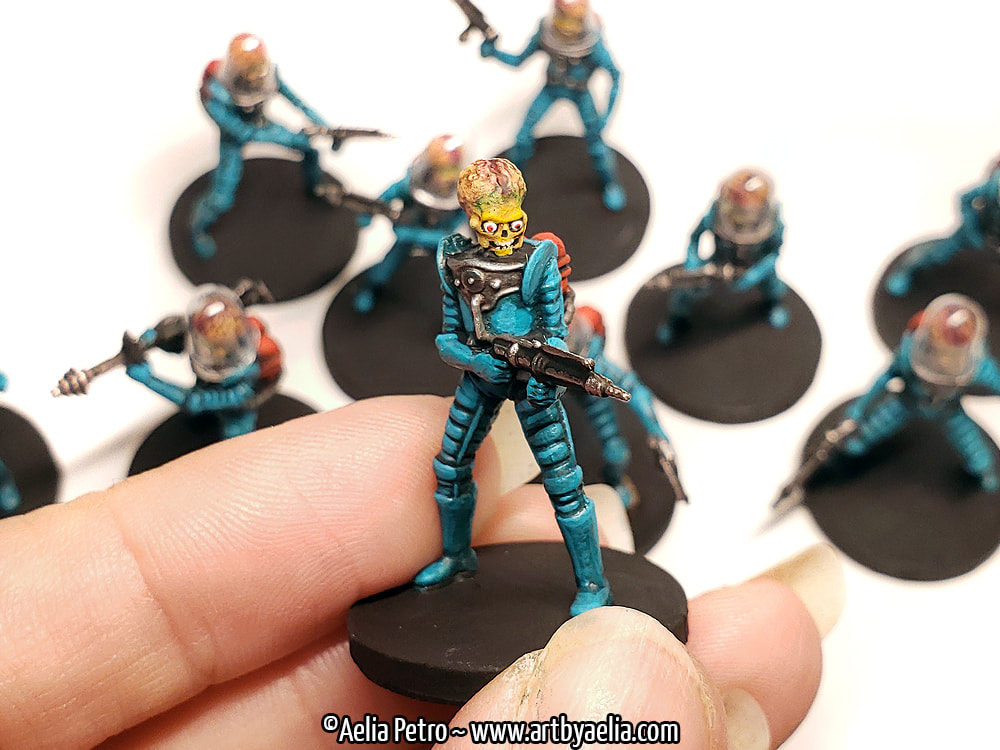
0 Comments
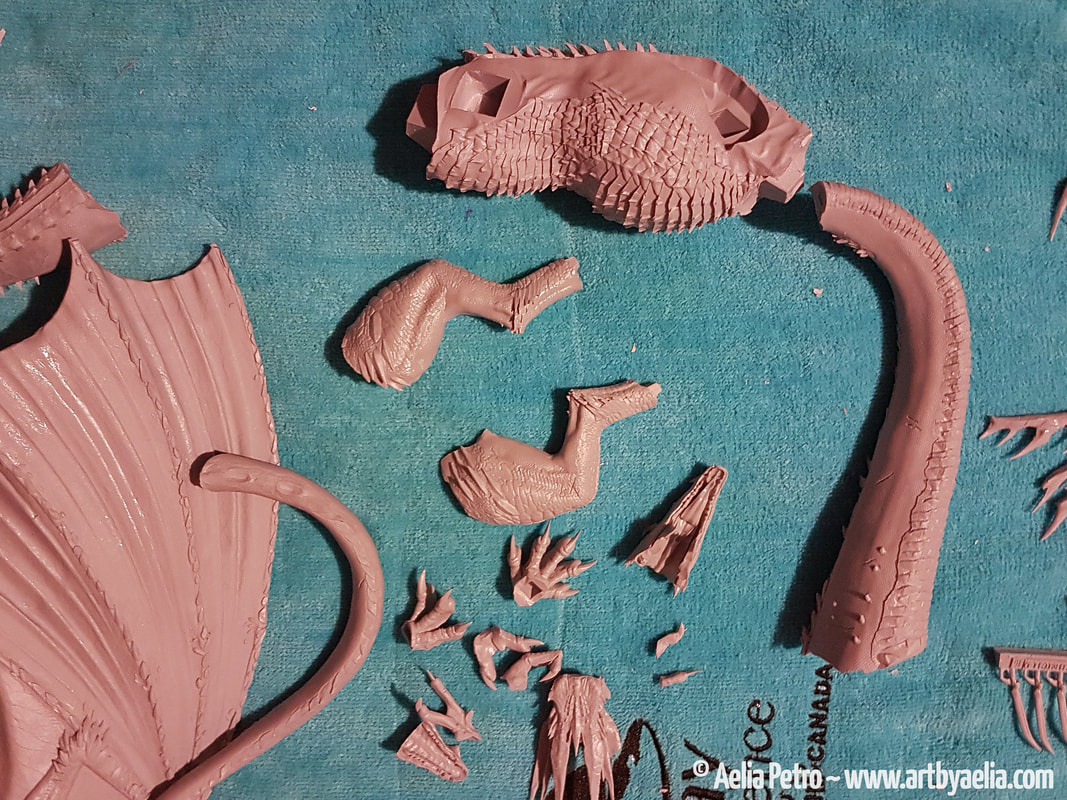
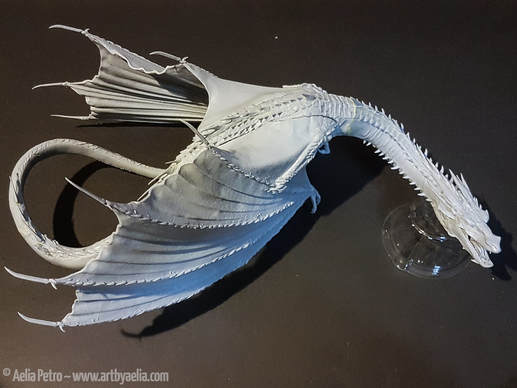
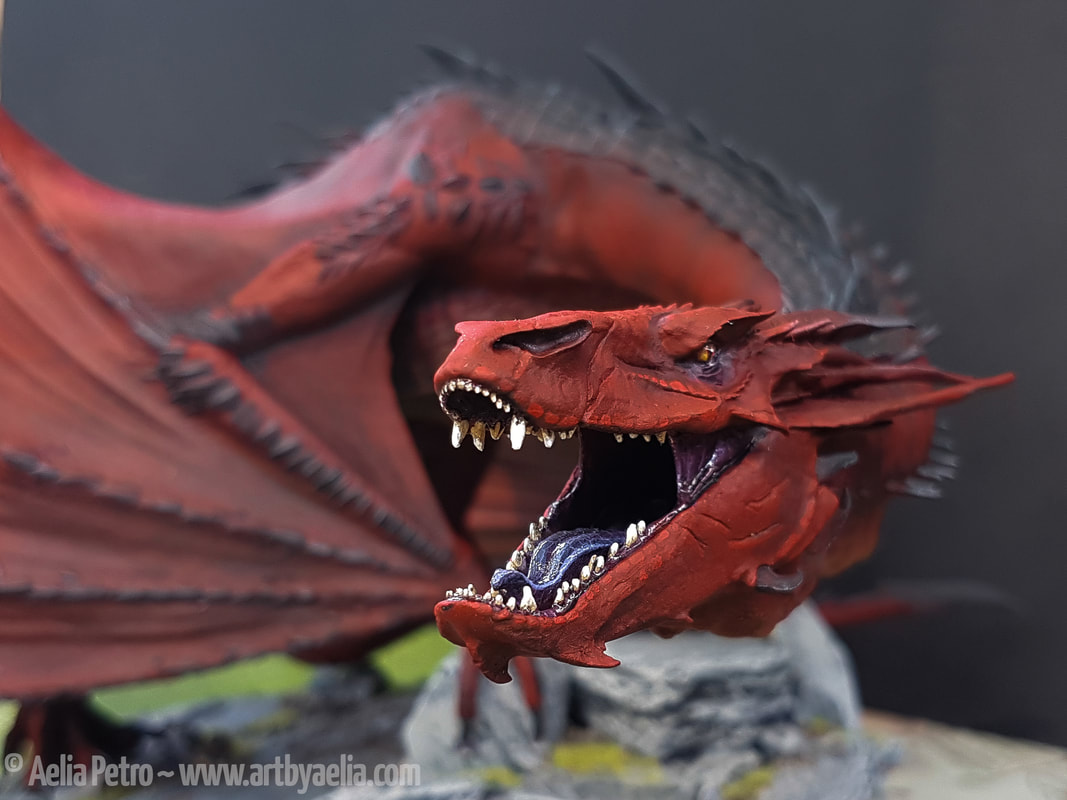 I finally did it... I assembled and painted Smaug. I've had the model for months, but have been too intimidated to give it a go. With a 1000 point all-hero tournament coming up, my ever helpful boyfriend suggested that I break out this beastie. I immediately loved the idea, and hated the fact that it would force me to work so quickly (for me, that is a VERY short timeline). Probably for the best, since otherwise this model probably would have been completed in spurts over the course of months lol... and thus, with 16 days to go before the event, I got to work! FYI.. Games Workshop states on their website: "This miniature is not recommended for children under the age of 14. Advanced modelling skills are required". This is no joke. I've been painting models since I was 2, and modelling for decades, and this guy was a serious challenge. If you want to do him justice, there can be no short cuts, and he is not beginner friendly. You'll need a shape blade in your x-acto, a couple of solid glues, a metric crap-load of filler (Milliput or Green Stuff, or what-have-you), and a great deal of patience. He will surprise you. He will test you. He will break. You will break. But with perseverance, you will wind up with an unbelievably gorgeous centerpiece to your collection.
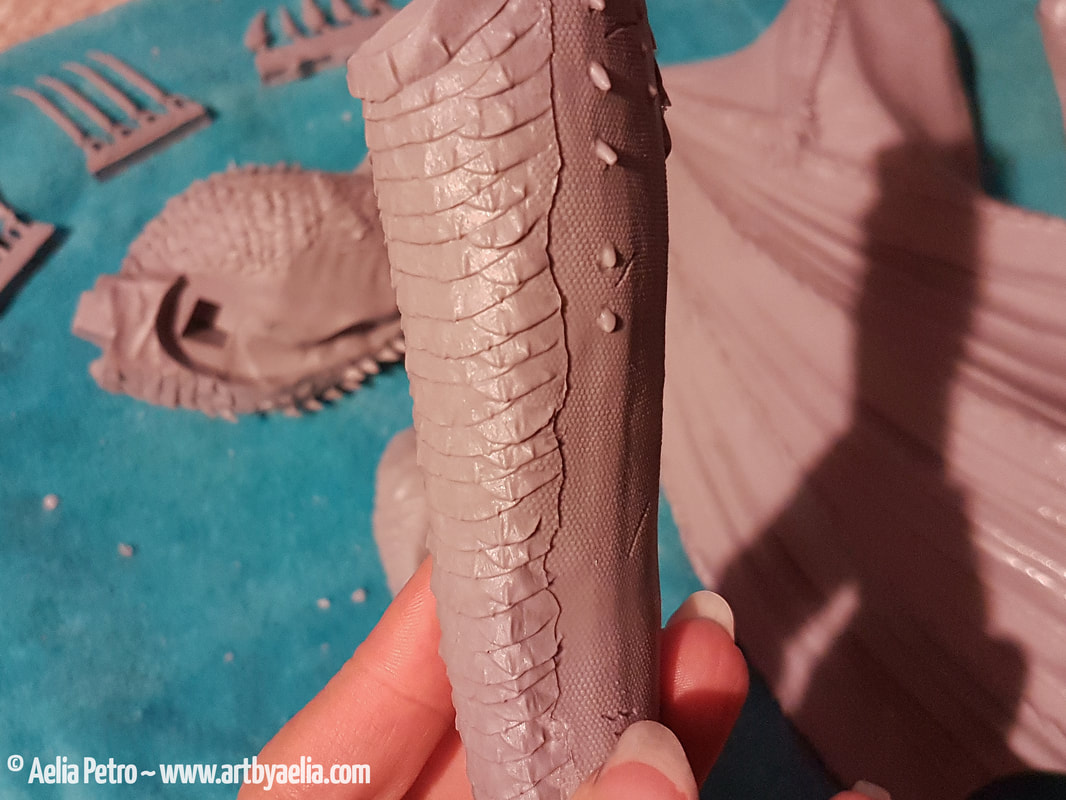
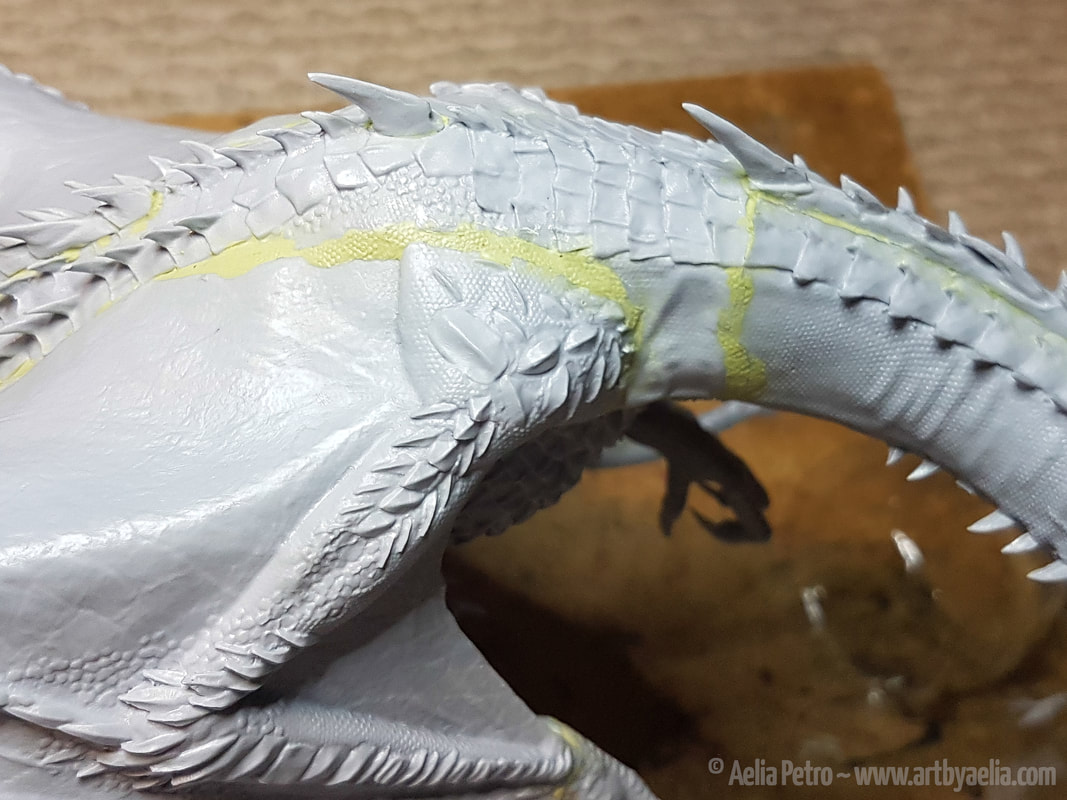
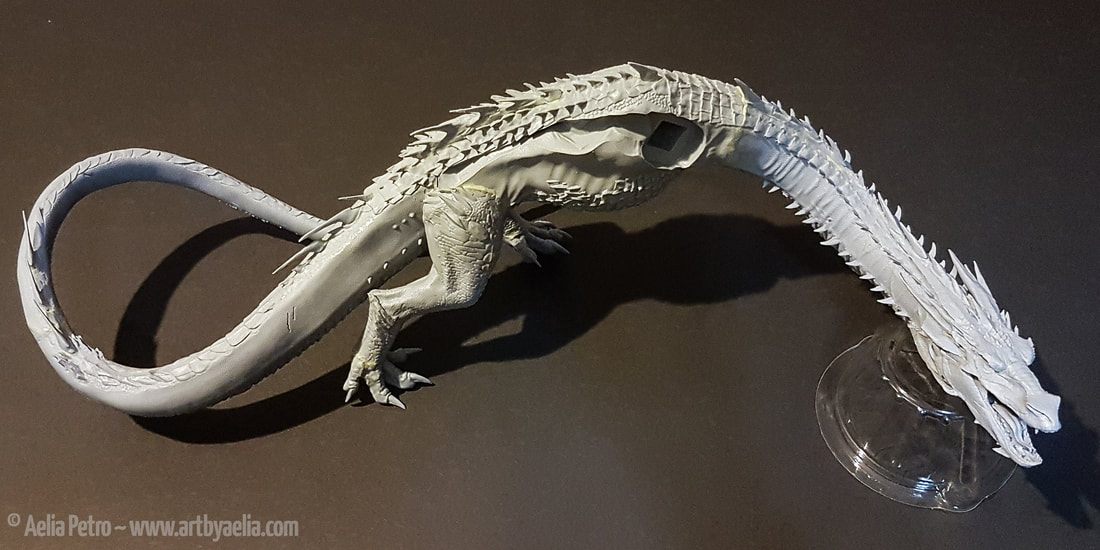 Next I assembled the head and filled the gaps in those pieces. I followed by gluing the head to the neck, and filling the gaps that followed. Then the neck and tail were attached to the body. Gaps aplenty. The texture stamp I created was helpful for maintaining the scale pattern in the newly sculpted areas.
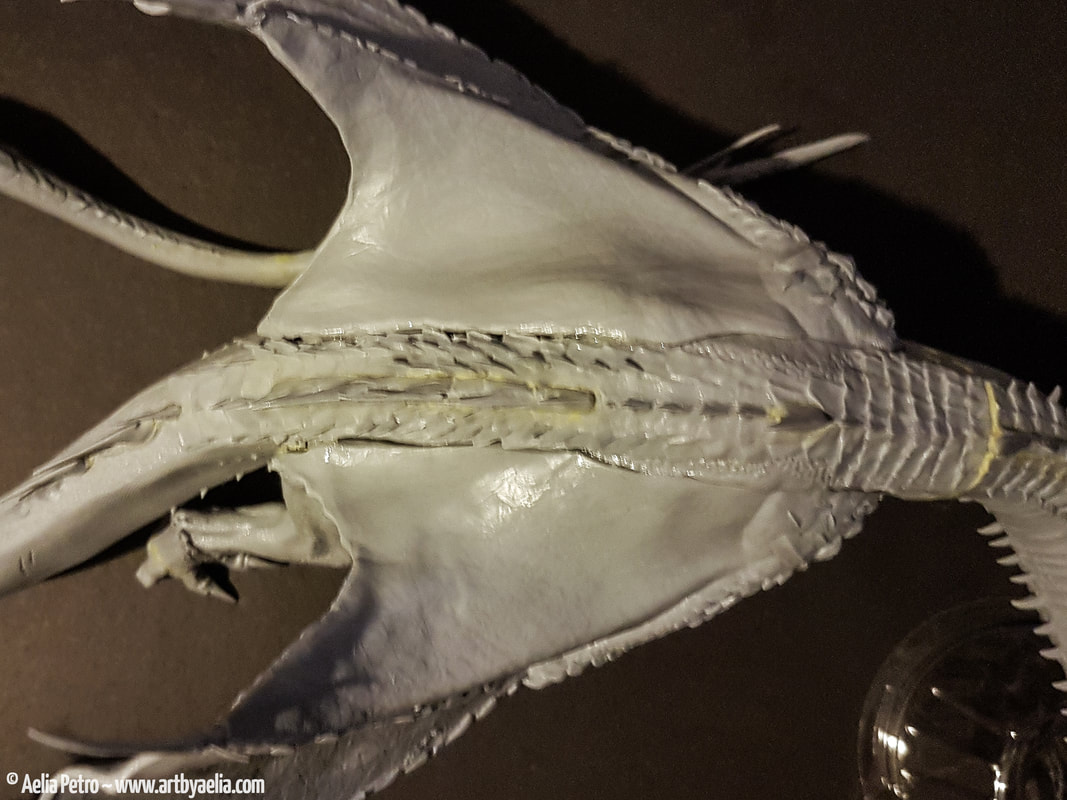
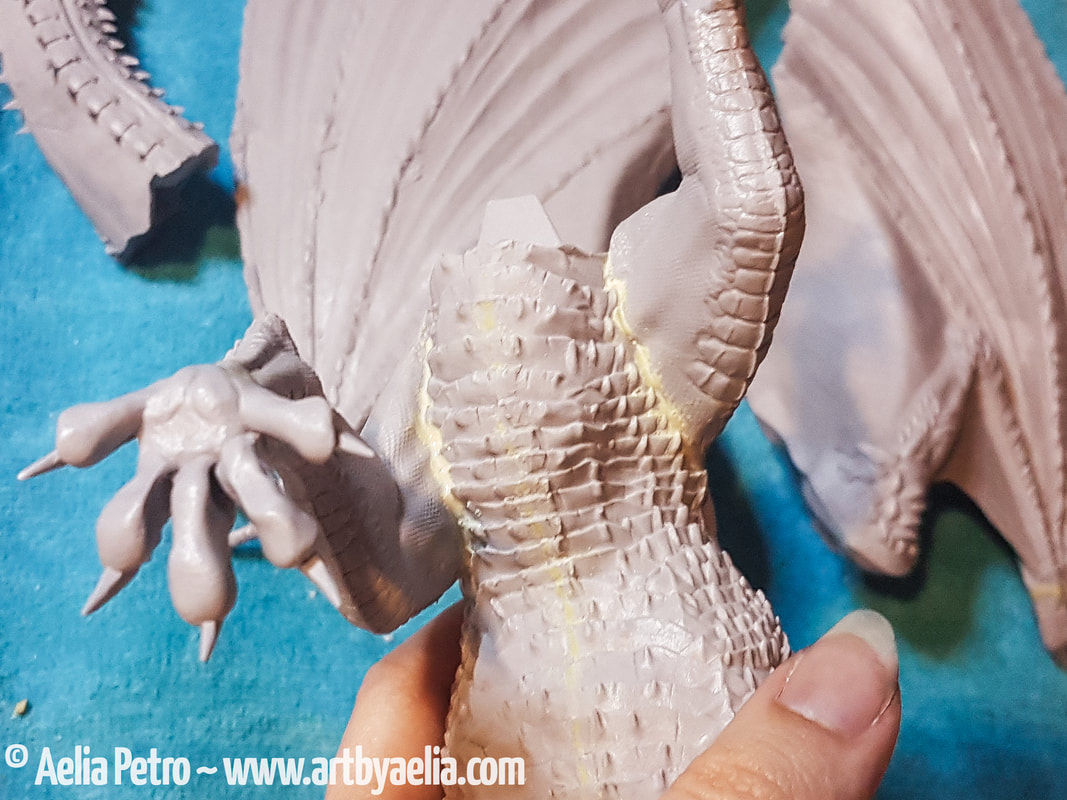
 More repairs and texture matching in progress. There was a massive space between the end of the wing and the side of Smaug's body, which had to be bridged.
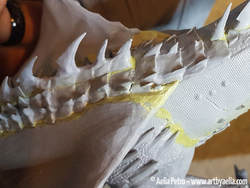
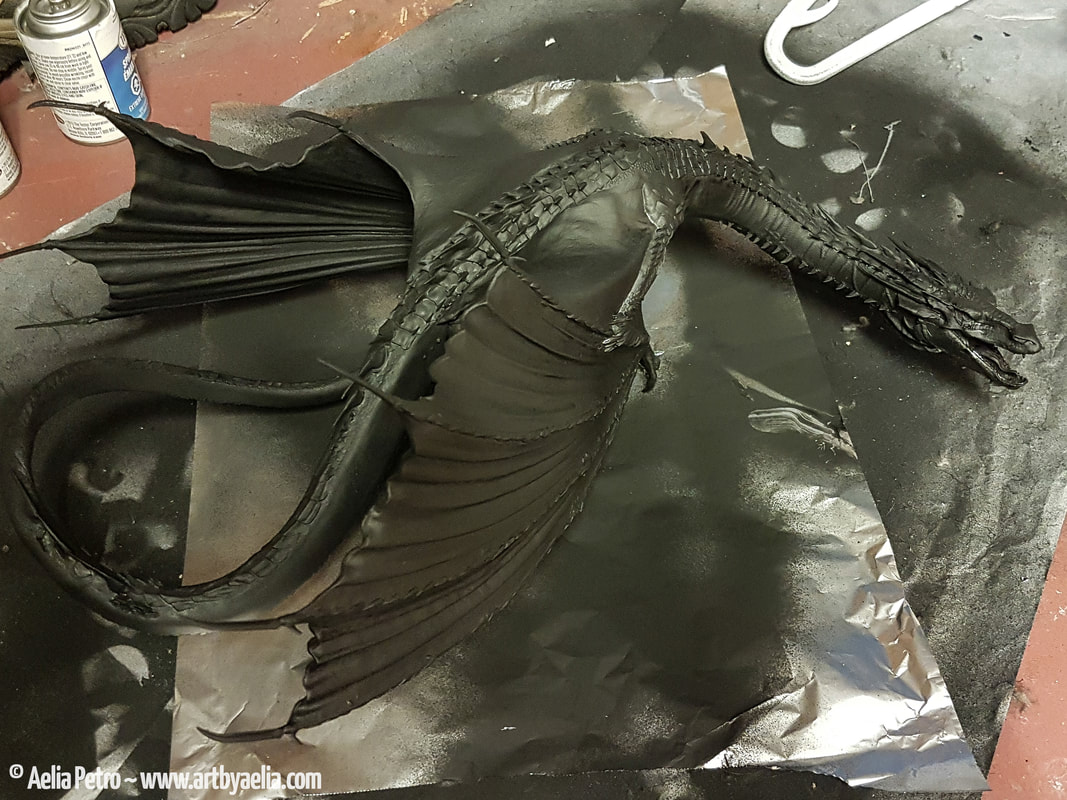
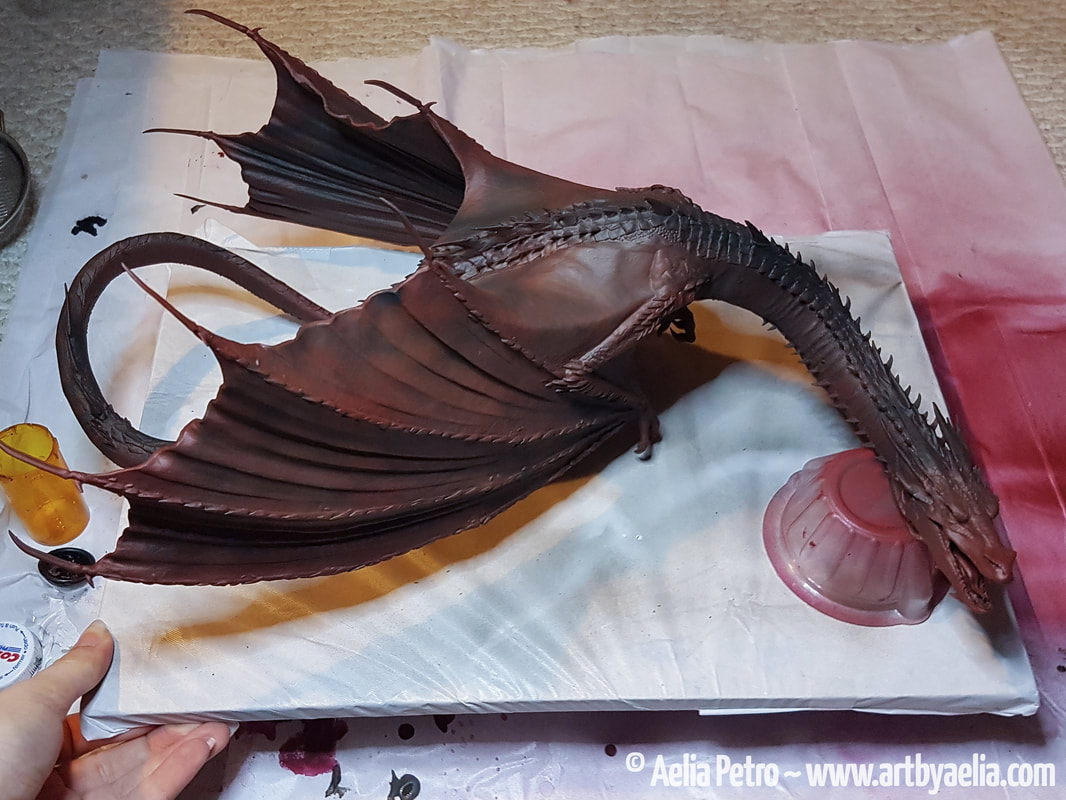
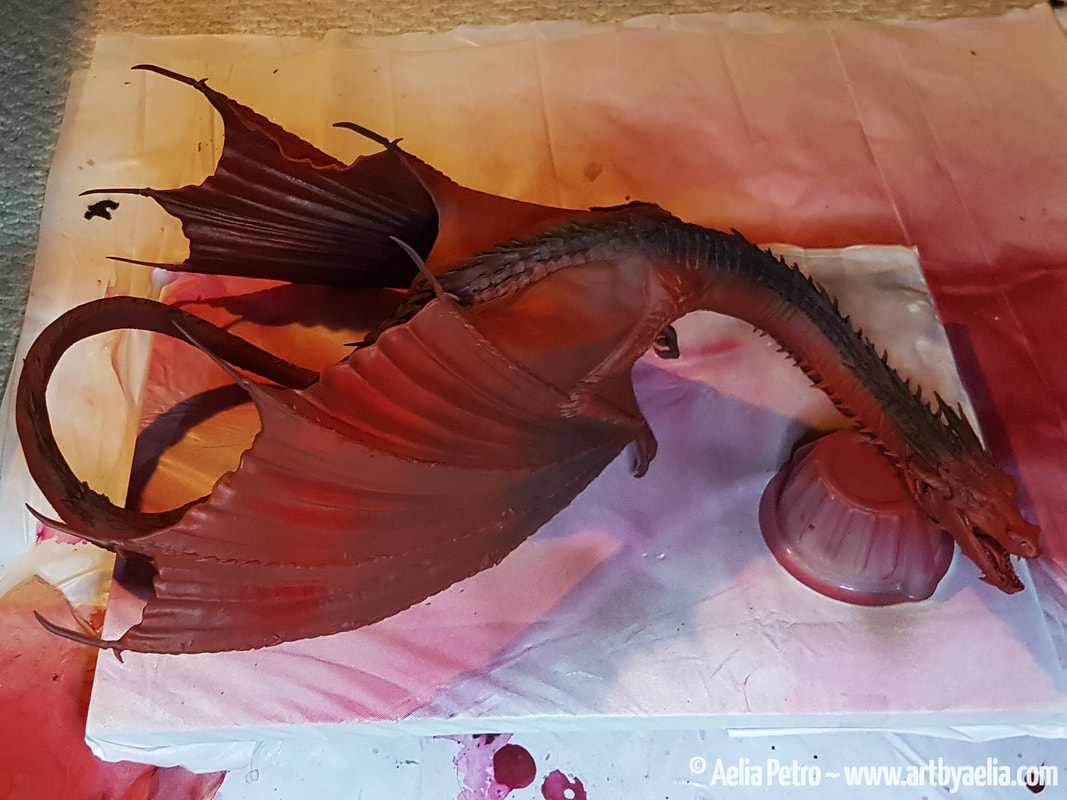
 Belly scales were next, and the pressure was on! I wasn't expecting to be so happy with the outcome of the air brushing, so getting the belly to a place I was happy with was difficult. I used a combination of airbrushing, dry-brushing, washes, and edge highlights to get to this point. Several shades of tan and brown were blended using dry-brushing, blending into the red of the body. Both Agrax and Nuln washes came in handy.
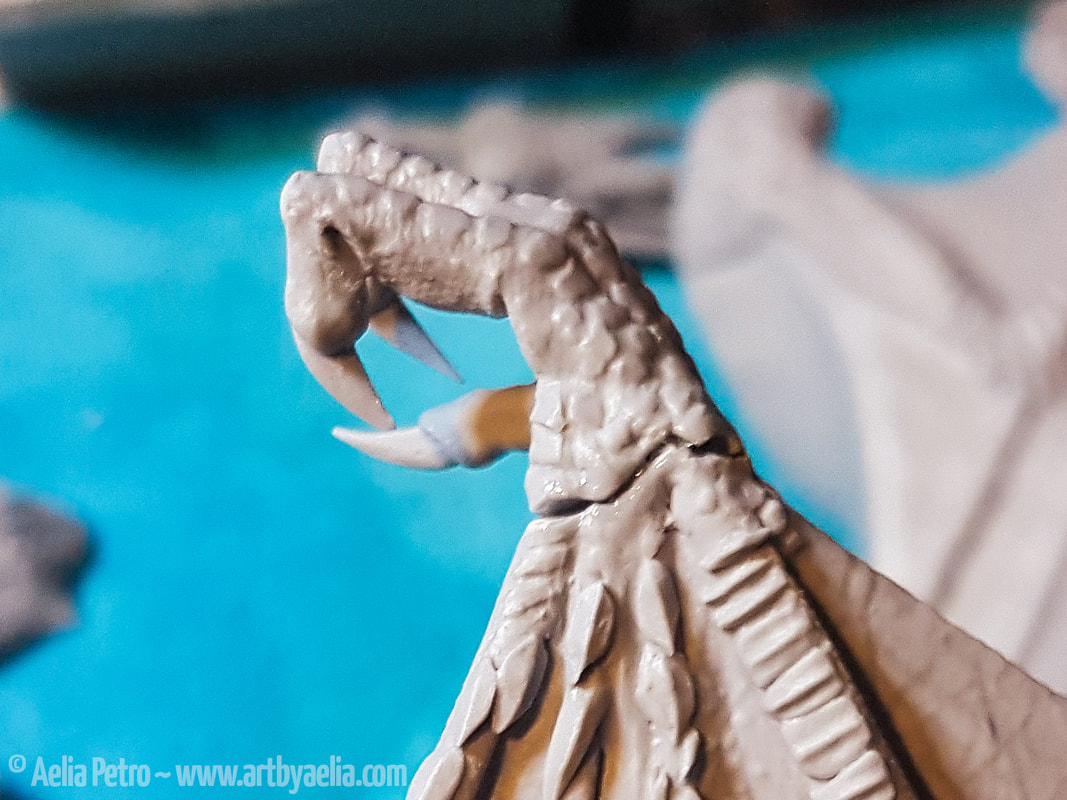
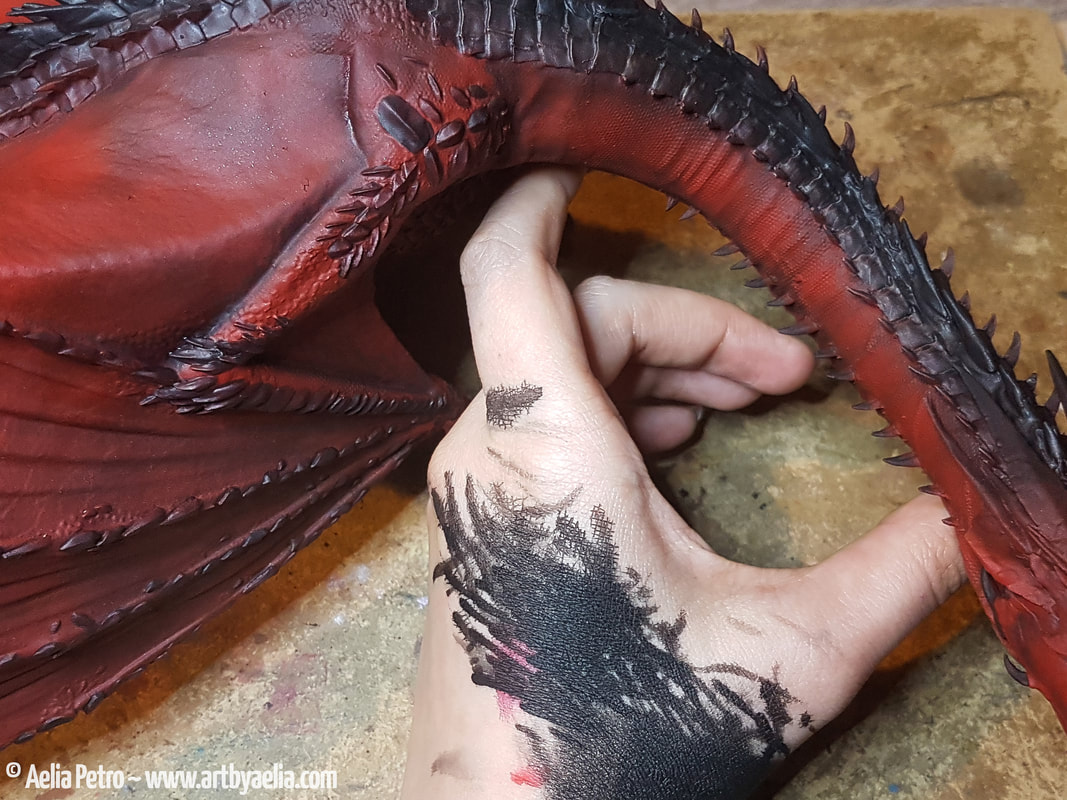
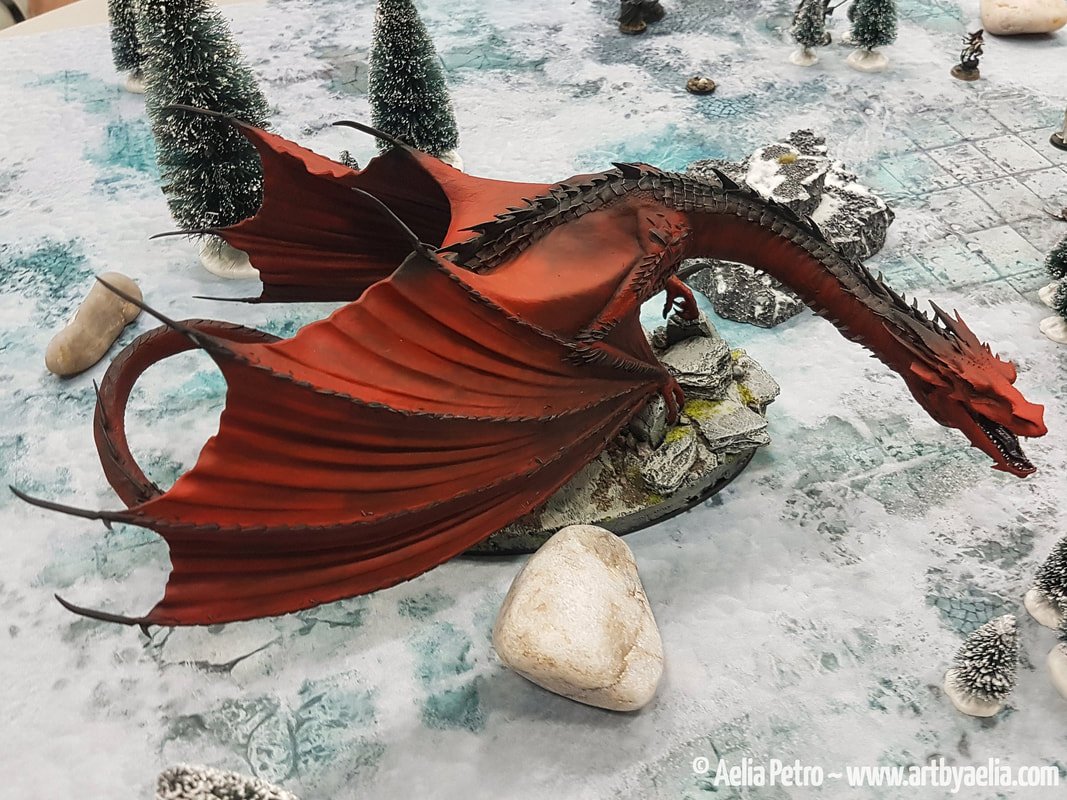
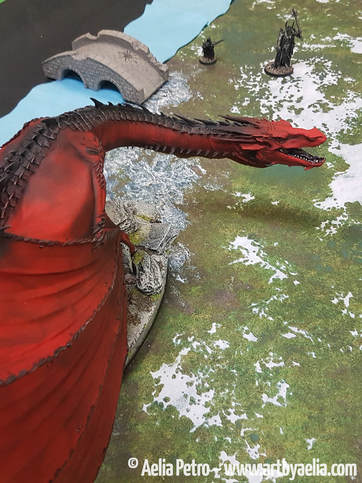
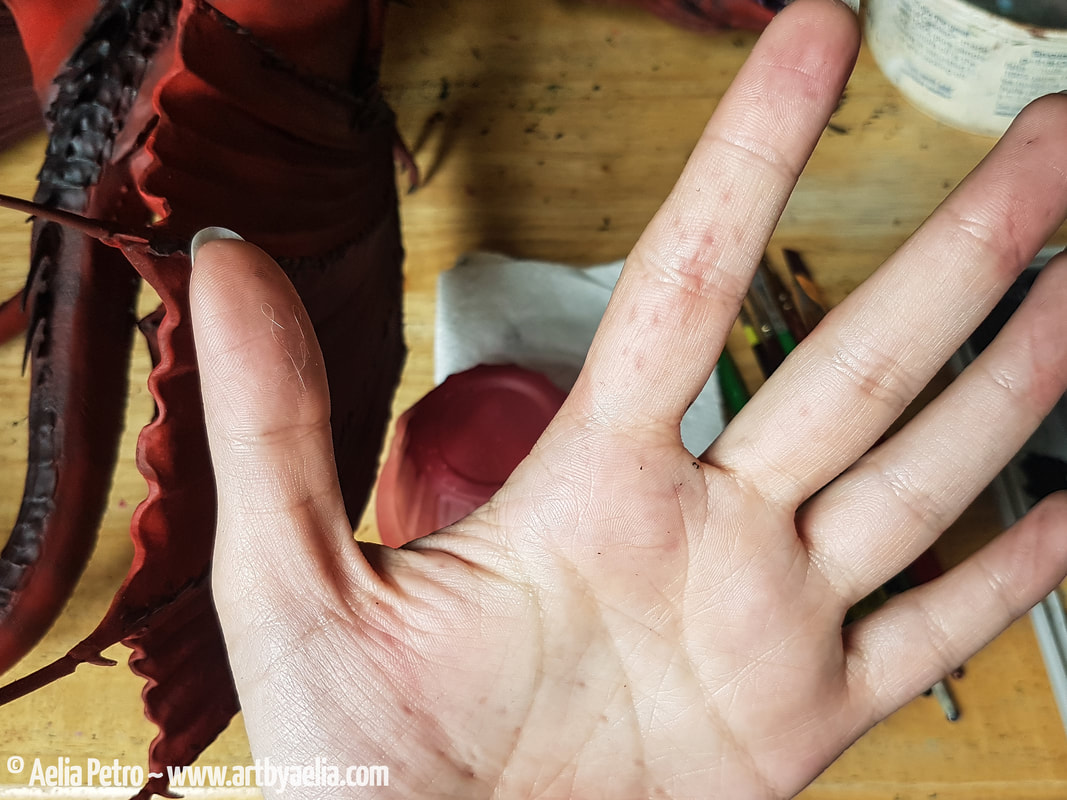 Holding Smaug proved to be one of the biggest challenges. I didn't want to paint in pieces and assemble afterwards because matching the blends to fill the gaps would have been impossible. It would have made some things a great deal easier however... getting a grip on him to access different parts was difficult and sometimes painful. You can see some of the little dents in my hand from his spines above. 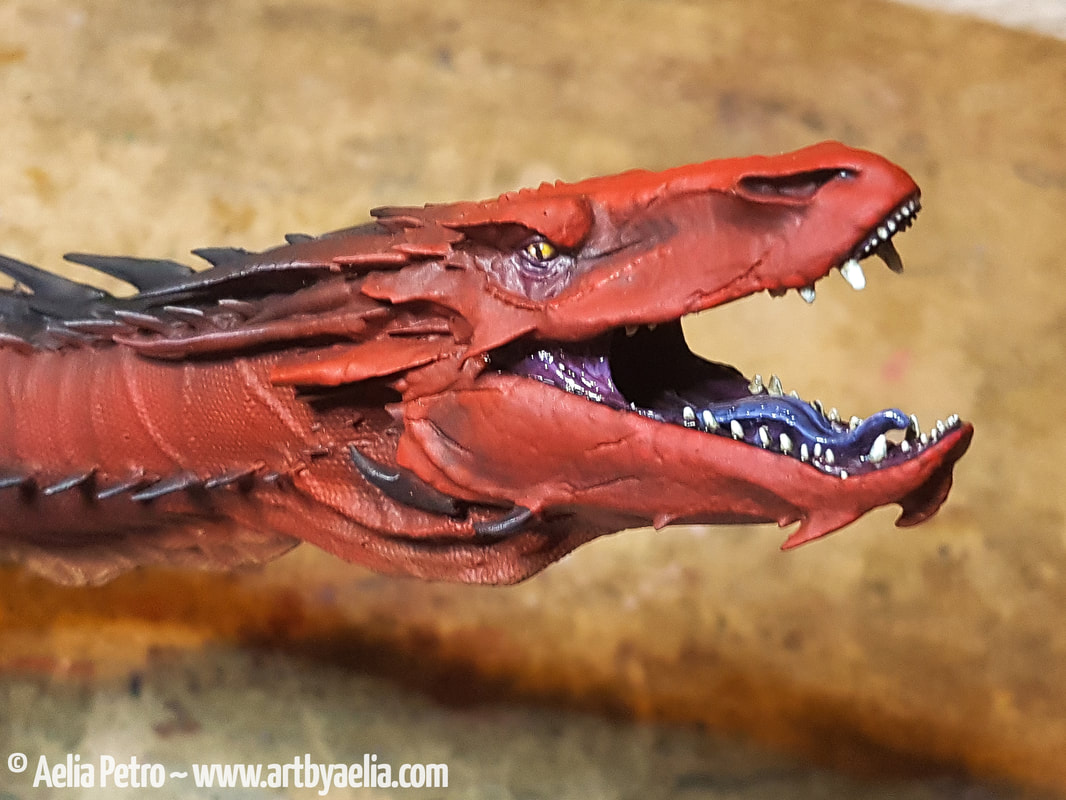 The mouth was a lot of fun to paint, I used a variety of shades of purple for the tongue and gums. The teeth were first painted brown, then a tan, then white, so that they looked suitably aged and shaded. I picked out a lot of face scales by hand with a liner brush, but it's difficult to see them in the photo. The entire dragon was varnished with Testor's Dullcote (my personal favourite varnish), and then I glossed the eyes and mouth to make him a little more life-like.
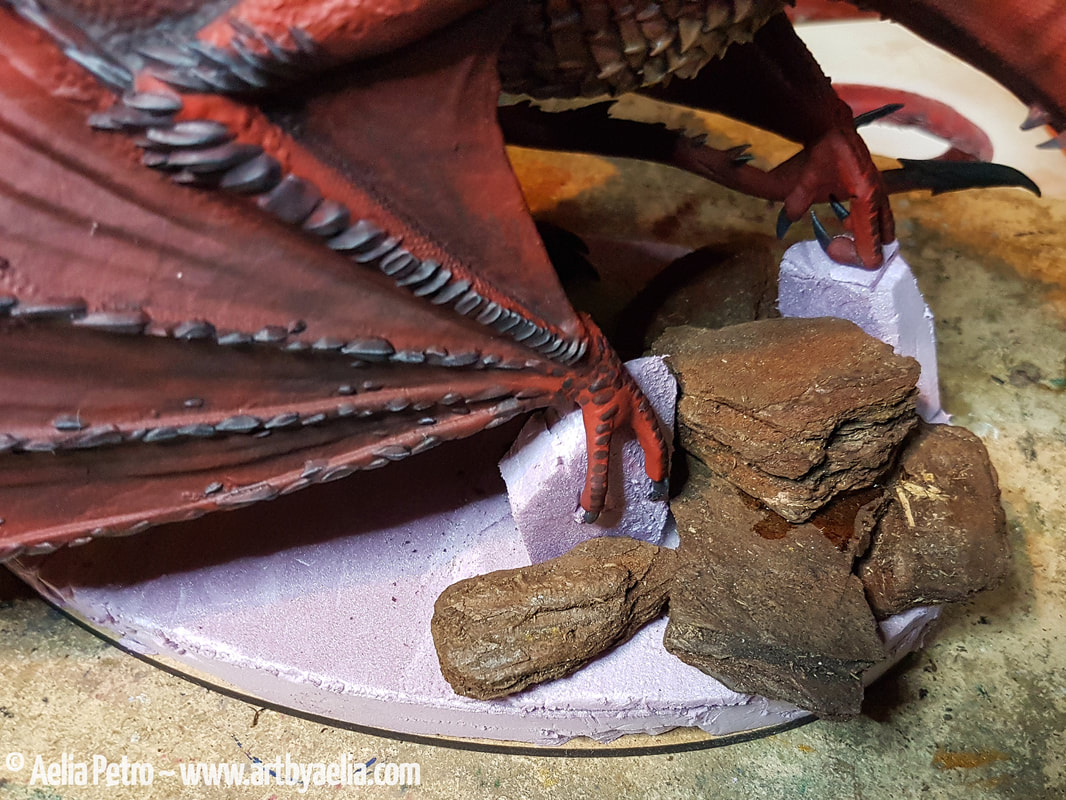
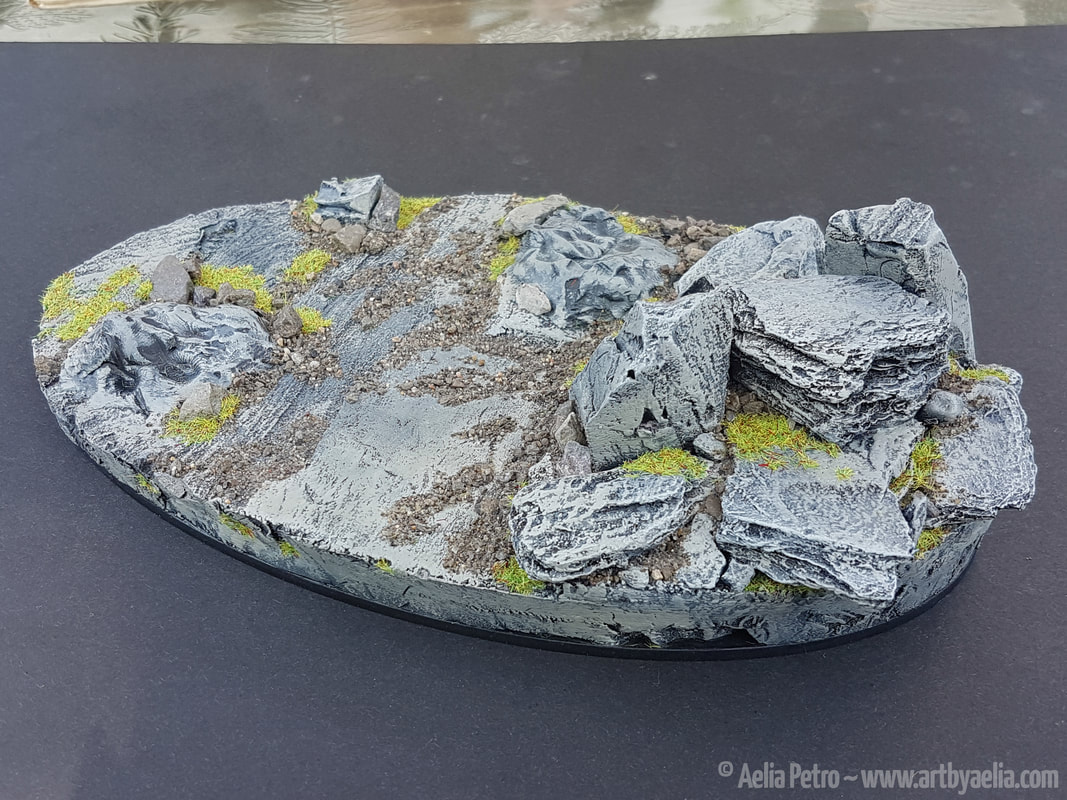 The finished base! I painted in several shades of grey, and then added some natural sand and stones to vary it up. I also added flock. 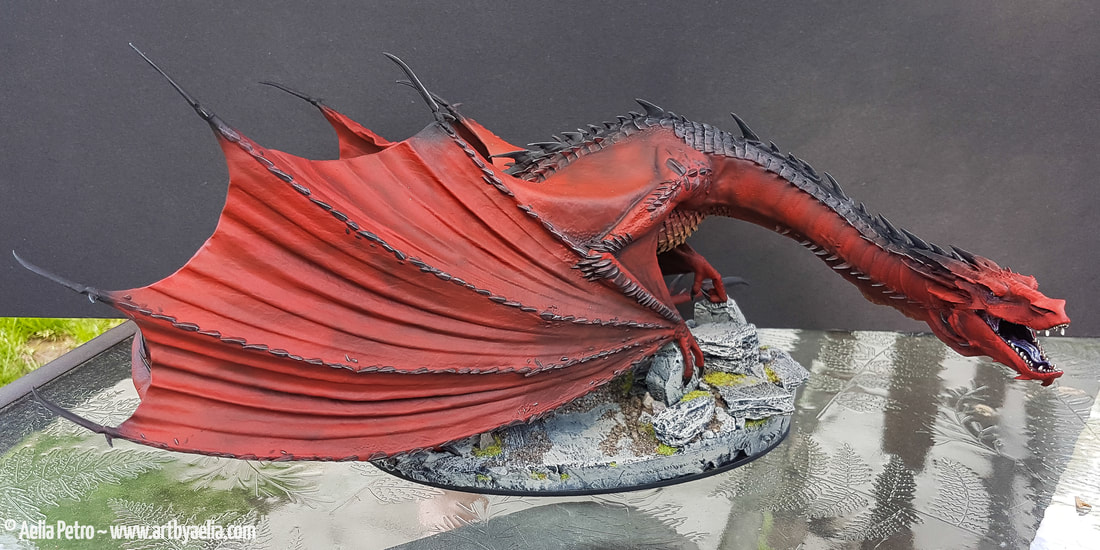 Here's the finished Smaug on his custom base!
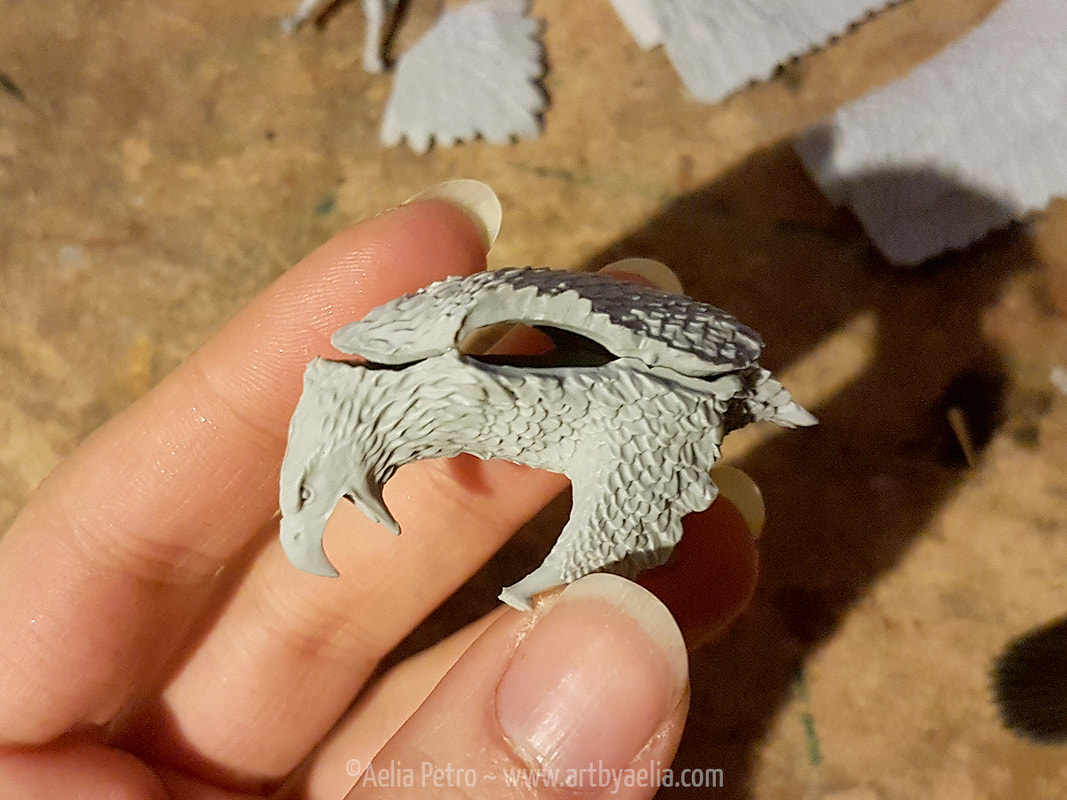
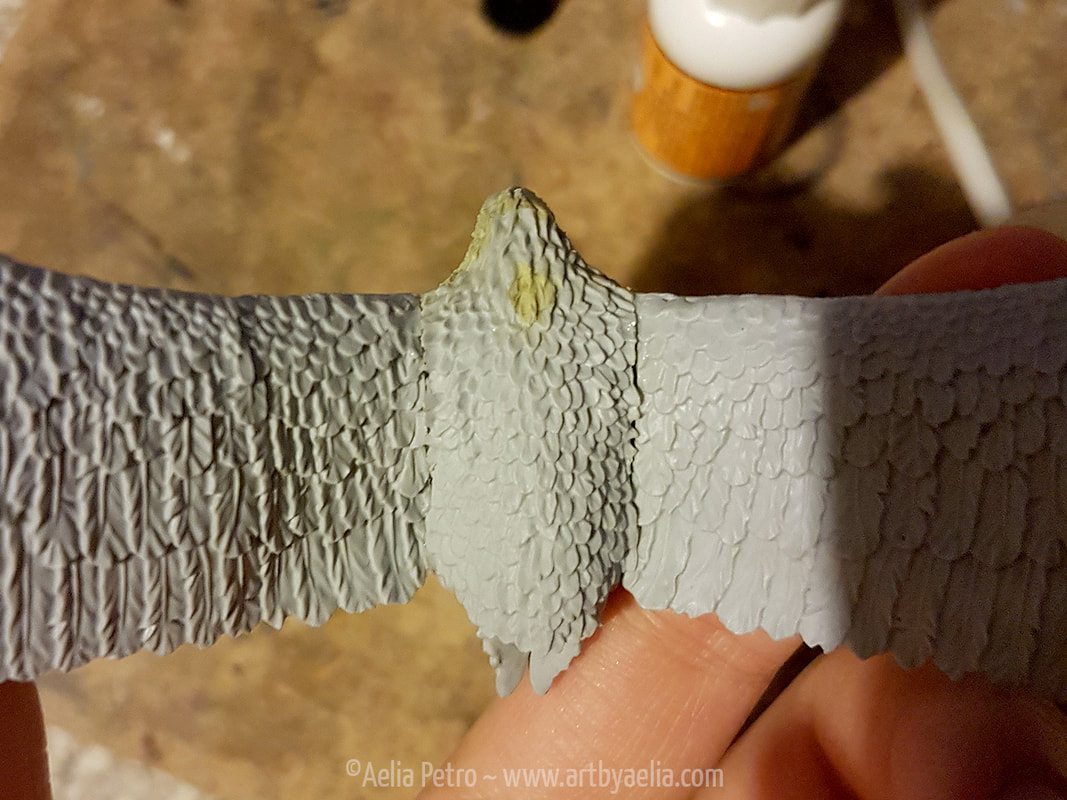
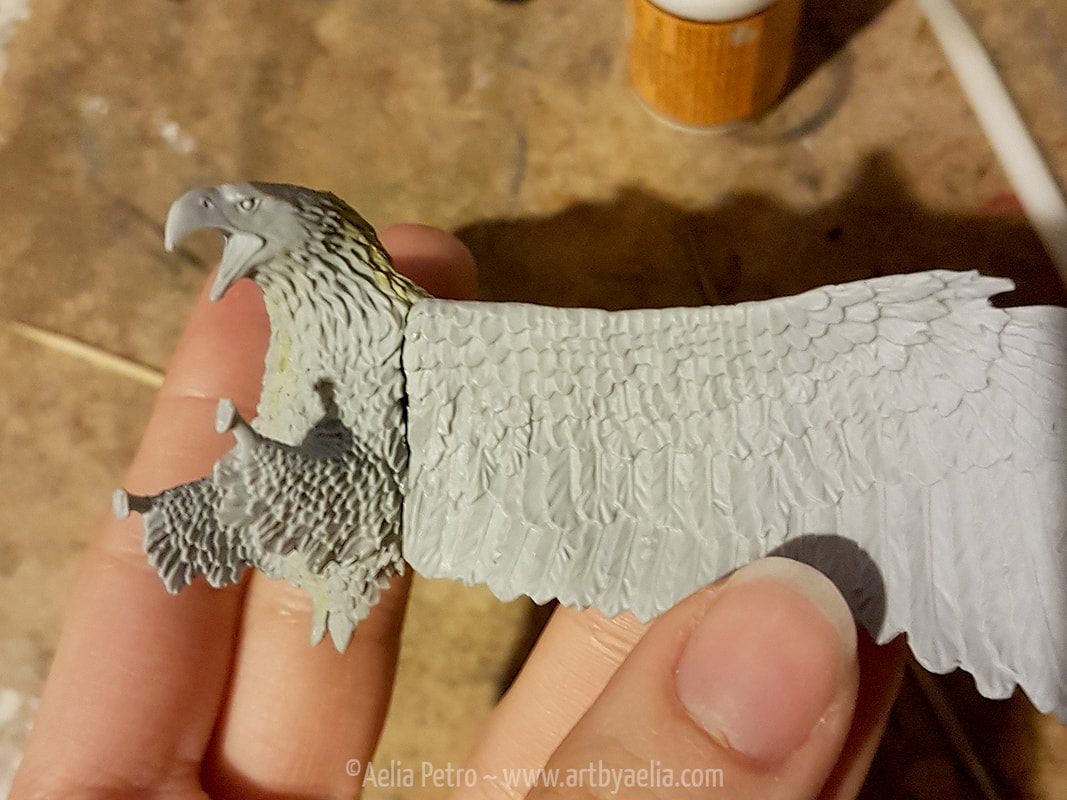
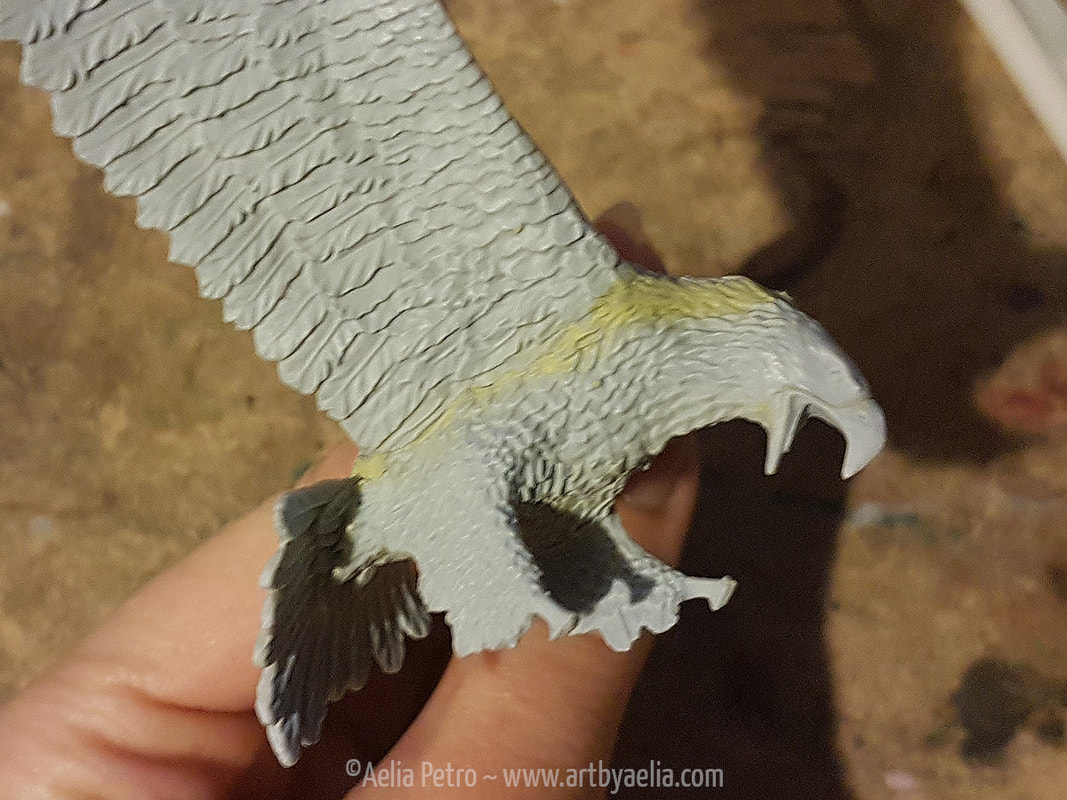
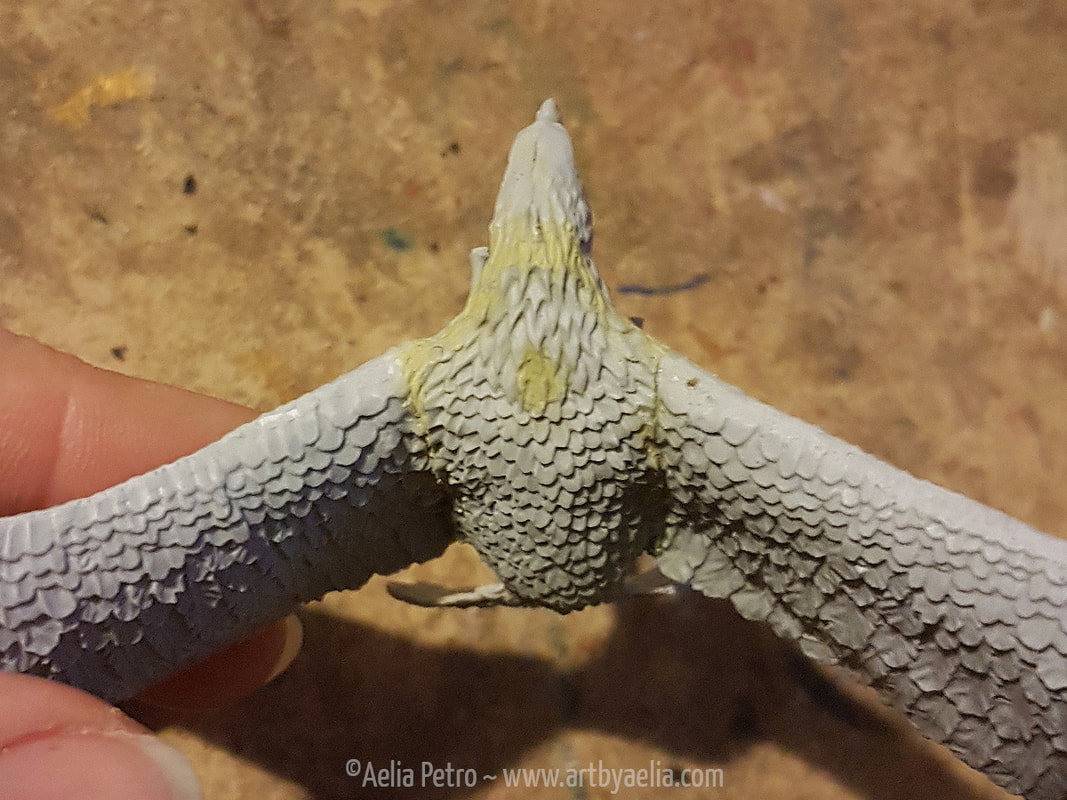
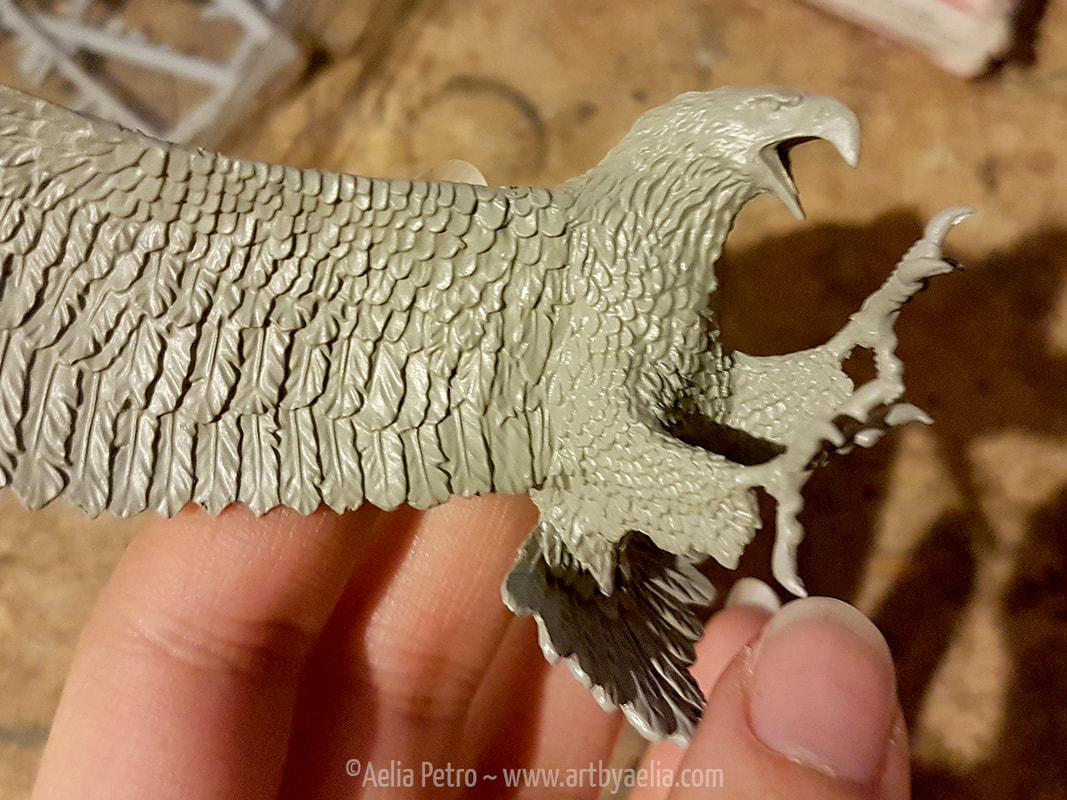
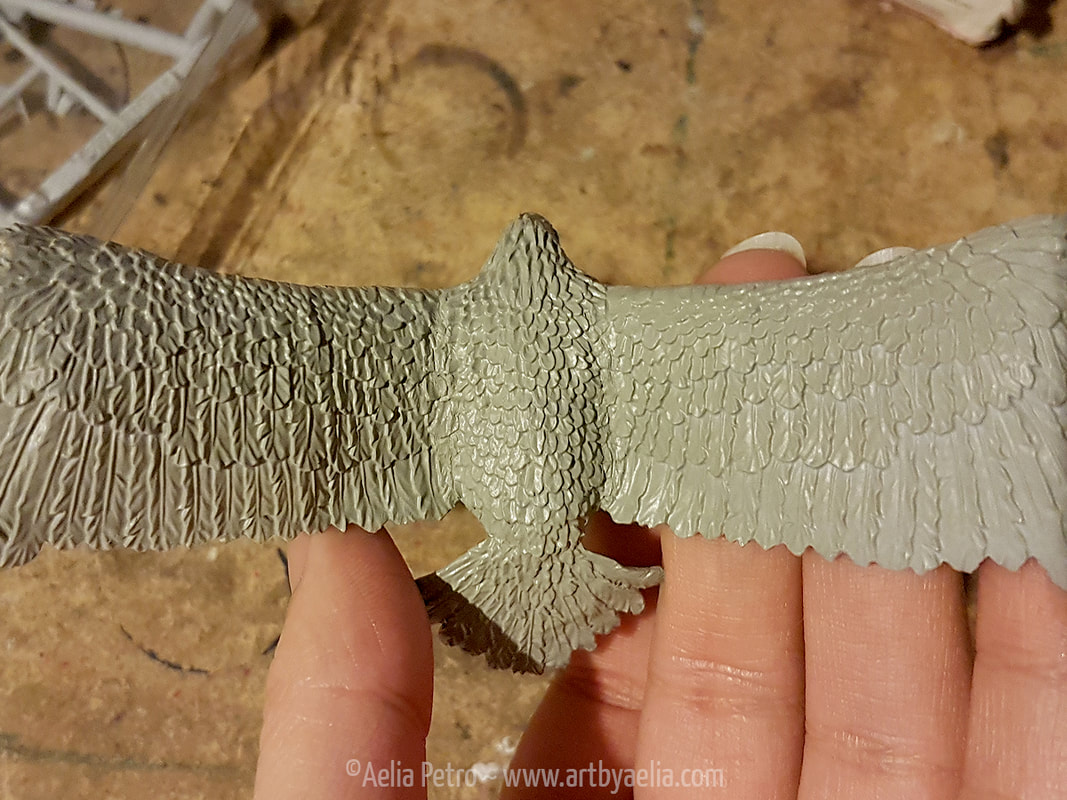
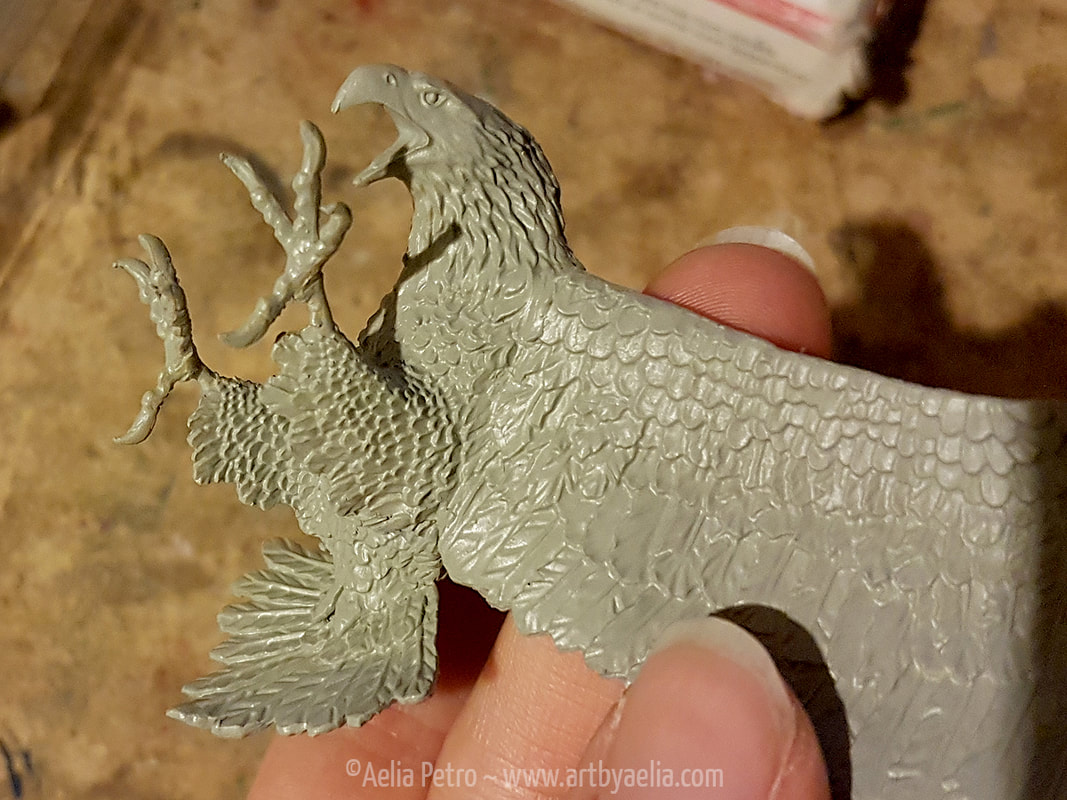
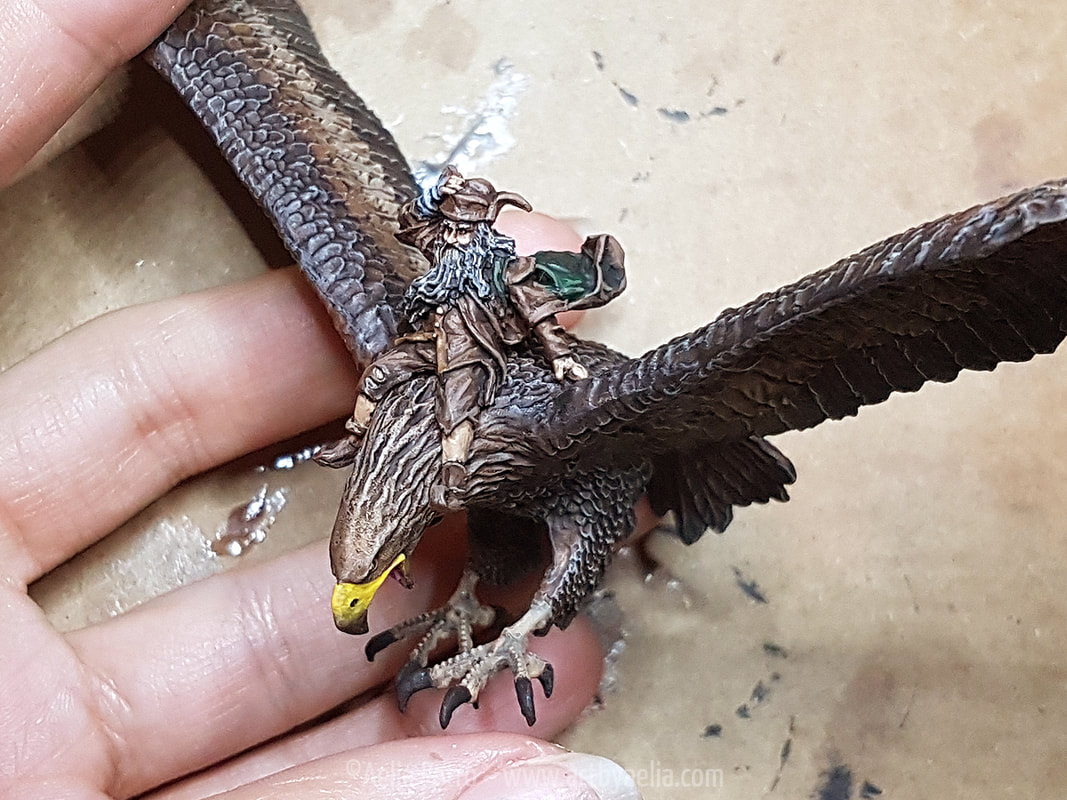 Another hobby project! This time a Games Workshop model, Radagast the Brown on Great Eagle. Looks relatively simple, yes? NO! As if VERY poorly fitting pieces weren't enough, I had to way over-complicate things for myself. Allow me to explain. The terrible, horrible, no good, very bad fit.WHY GAMES WORKSHOP, WHY?!?! This resin model kit has some truly appalling joins. I mean seriously. The unintentional gap where the neck meets the body is almost as wide as the intentionally made hole for the wings! WOWZA. There are also huge gaps where the wings meet the body, and along either side of the body between the wings and tail. Just awful. A bit of hot water was able to warp the two body halves into fitting together well, but the rest were beyond the powers of hot water. Milliput required. MUCH Milliput. EDIT: GW did send me a replacement for the warped pieces, their customer service is super helpful. It's still not a great fit, so be prepared for that if you purchase this kit. They are super helpful though, and their support was much appreciated! Buy with confidence that they'll make it right. Let's make it complicated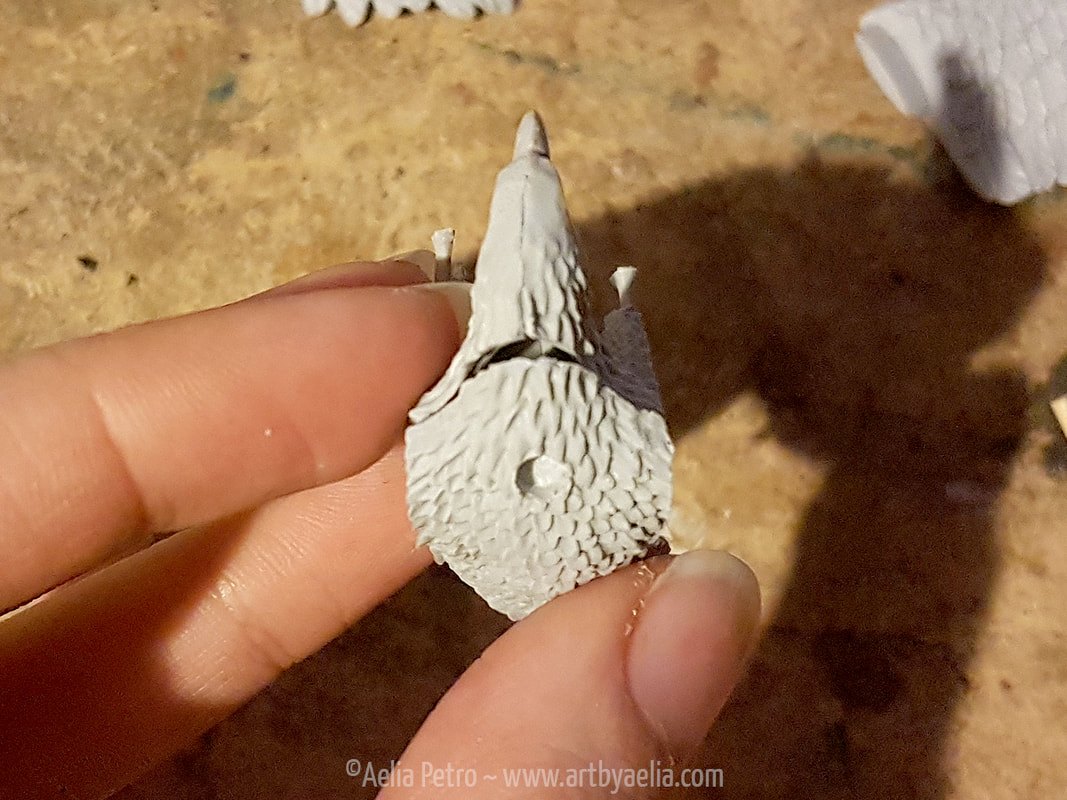 In for a penny, in for a pound. I HATE mounted models that can't be removed from their mount. In a game where riders dismount voluntarily or otherwise, it's annoying, and I might want to use the eagle without the wizard. Radagast unfortunately doesn't sit very well on the Eagle on his own, he will always fall off. Ugh. Since I want the option of using the Eagle without Radagast, and don't want to have an alternate Eagle to use if/when Radagast dismounts, gluing him onto the eagle was a hard pass. I also hate using pins because then when you remove the rider there's either a hole or a pin, and that's ugly, so no. I opted to try something new (to me), using magnets. But I did NOT want the magnet to show on the Eagle, because that'd be even worse than the pin. The plan was to drill a hole large enough for the magnet, but deeper than required so that I could sculpt a thin layer of feathers on top of the magnet, concealing it. Above is a photo showing the neck gap, and the hold I dremelled for the magnet. It almost killed me to drill into the sculpt, and I worried I wouldn't be able to match the feathers, or would ruin it... but I proceeded. I started filling the gaps with Milliput and sculpting new feathers to blend the seams. You can see some of the gaps, and the Milliput used to fill them in the photos above. Some progress photos showing the sculpting process. The gaps have all been filled. The sculpting is finished, and all base coated. I was pretty pleased with how the sculpting worked out. The painted Eagle and rider!I used my typical assortment of craft acrylics to paint up this piece, and will seal it shortly. Still planning the base. And just because I'm SO FREAKING HAPPY with the way the magnet solution turned out, here's a video. IT WORKS and I. IS. HAPPY.
It’s been WAY too long since I blogged here, so I decided to dive back in with a passion project I’ve been working on… a Games Workshop Lord of the Rings 25mm Legolas and Gimli figure! This mini is one of my all-time favourites in the LotR line, in no small part because the Legolas/Gimli dynamic never fails to crack me up.
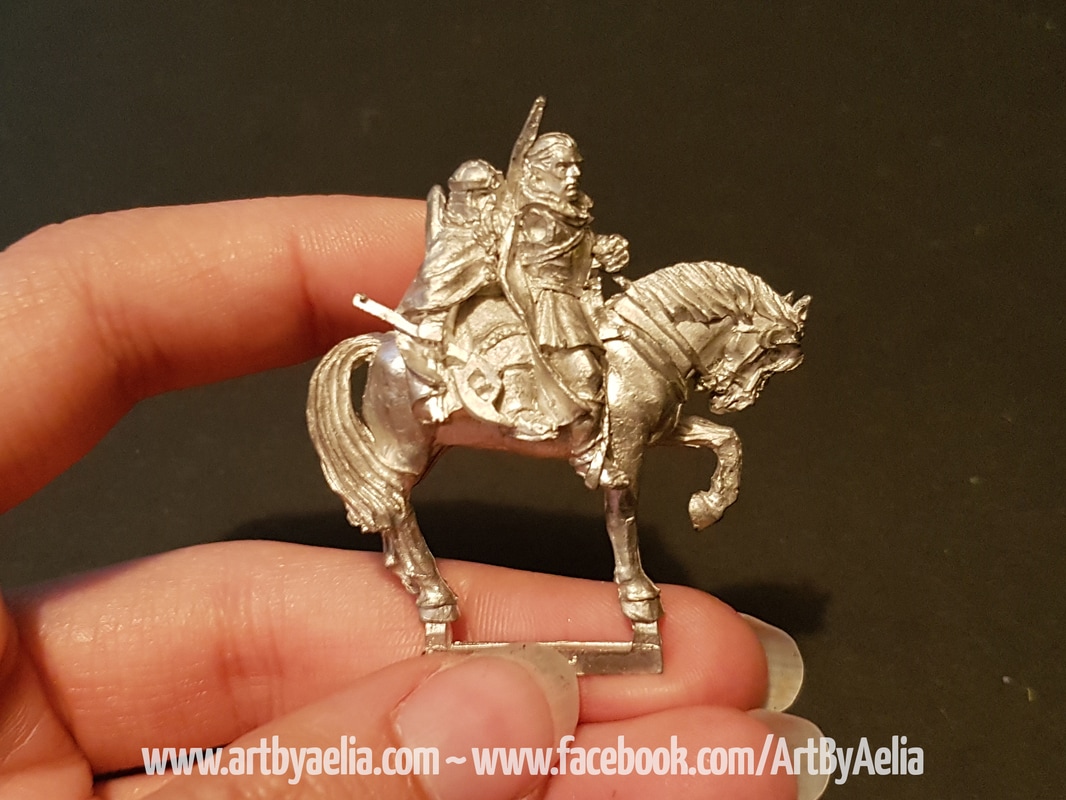
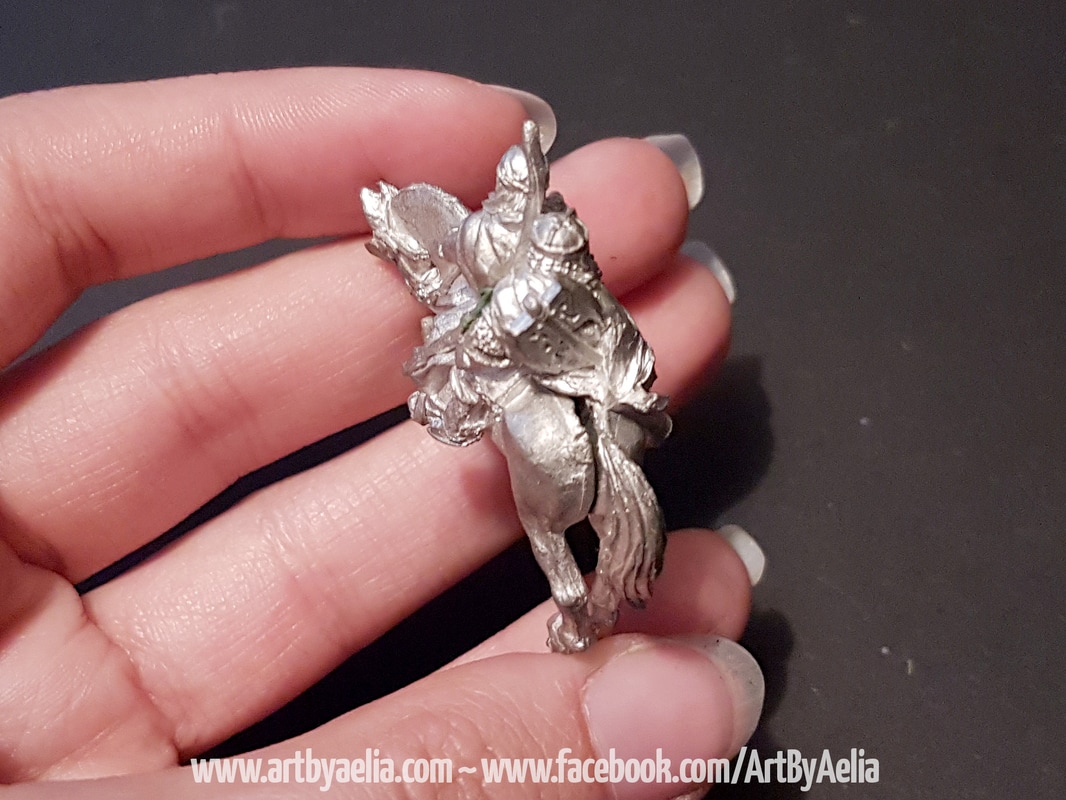
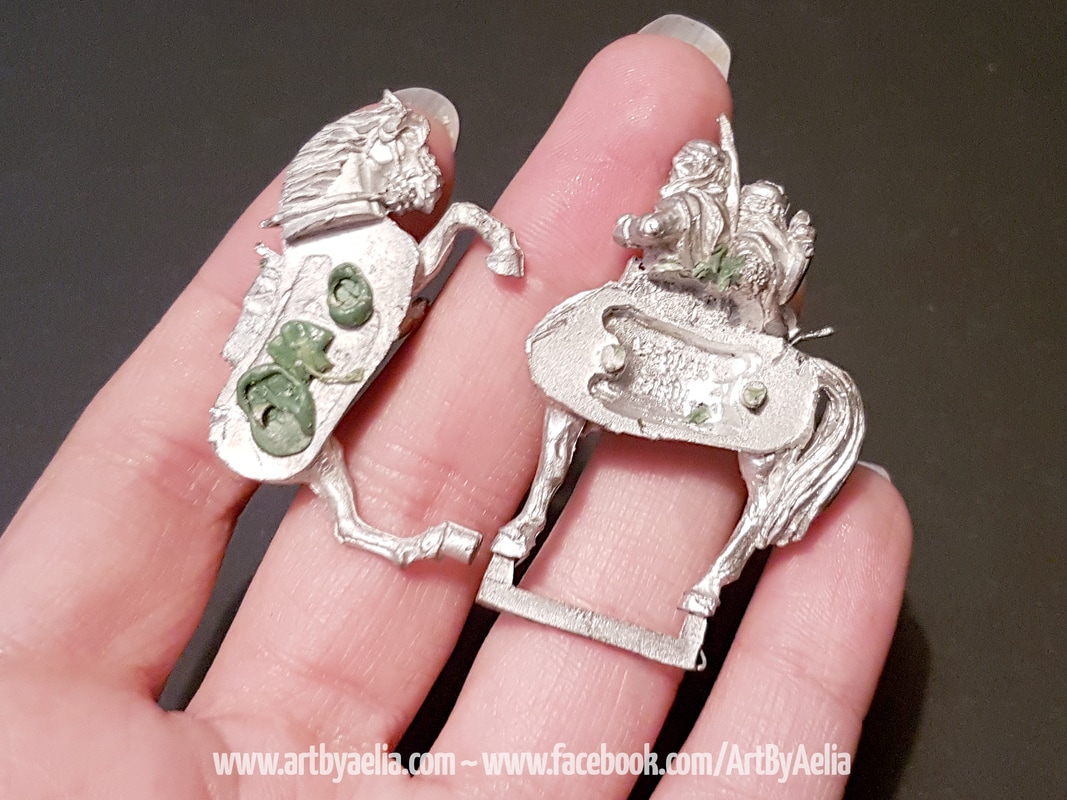
I begged a hand from my boyfriend who prised apart the two pieces for me. I cleaned off the green stuff, and reassembled using 5-minute epoxy glue. I then filled the gaps in the horse using milliput (a two-part epoxy putty like Green Stuff, but with a longer working time), and sculpted new details on the left side, to complete Legolas’ and Gimli’s waists where the two pieces fit together. Also resculpted a portion of Legolas’ bow, which was split in half for molding. The arm was the most difficult part. I used a hand and forearm I had from a “Breaking of the Fellowship” Legolas, attached it to a pin to extend it to the right length, pinned it to the shoulder, and then sculpted the upper arm and shoulder from scratch. I also wound up having to sculpt some of the bracer on his forearm. Once the sculpting and filling was complete, I gave it a quick base coat in grey to see how the details were shaping up. 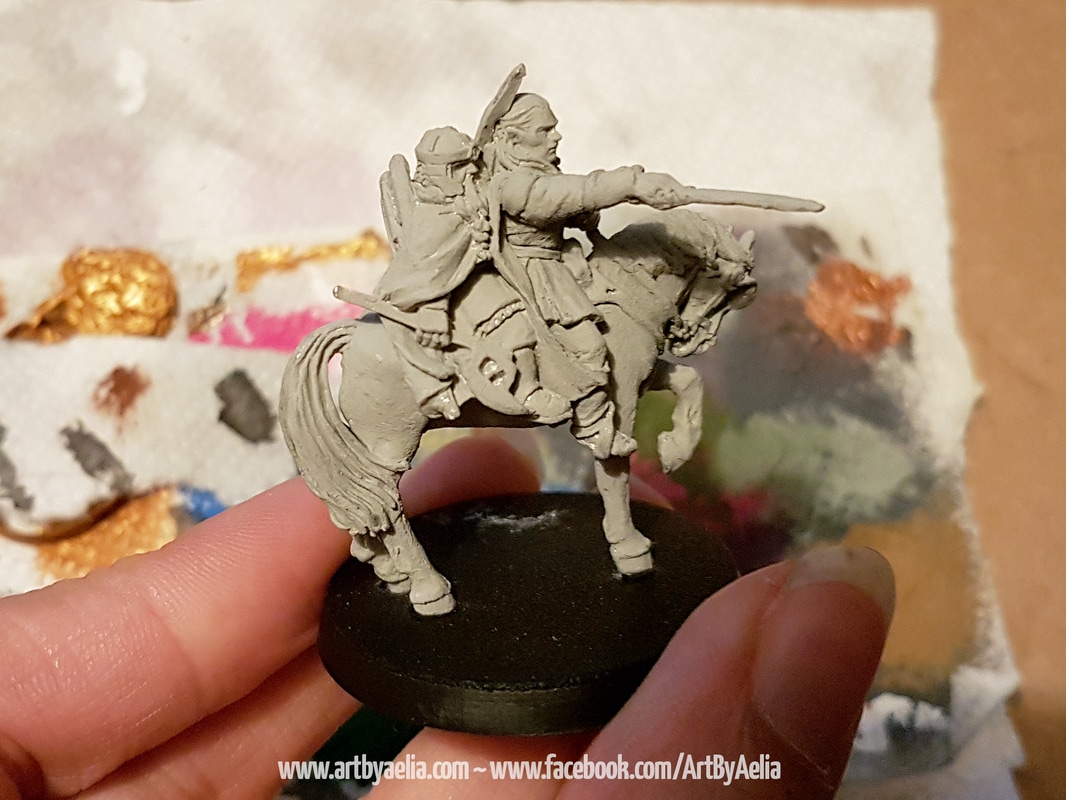 I began painting with the skin (I like to start my models from the skin and work my way out, layer by layer until I reach the outermost layers of clothing and weaponry). I’m just going to say this, I HATE PAINTING WHITE. It’s the worst. Single most challenging colour to get right. I know Arod, Legolas’ horse, is white/grey, and I was sorely tempted to paint it brown instead (because I actually enjoy painting brown horses), but wanted it to be as accurate as possible. I decided to go with a grey/white. Starting with a medium grey base, I used thinned paints in many layers to slowly build up colour, getting lighter and lighter until it was almost white. I did the same thing along Arod’s legs, but getting darker and darker grey. I hit the mane with a nuln oil wash to darken it, and then used thinned black paint to add the gradient effect on the mane and tail. After that I began painting the dwarf and elf skin, which involved a flesh base colour and Earthshade wash. Later on I built up the colour on the skin in several layers with a very fine brush. I even painted the eyes (which I avoid like the plague on 25mm figures, because their eyes are so unbelievably tiny, and it’s difficult not to make them look bug-eyed) using an 18/0 brush. A trick I like to use for painting such tiny things is to hold my breath, pay close attention to my heartbeat, and actually stroke the brush between heart beats so that my hands are as steady as possible. A bit of a pain, but it helps! Used the same trick for painting the hair. I’d tell you how I did the blonde hair, but I honestly couldn’t say. I painted and repainted it so many times in so many layers that I completely lost track over what was still showing. I almost ripped out all of my own hair in frustration, but ultimately reached a colour I could live with. Each bunch of hair was painted individually with the 18/0 brush. The finished model used several different shades of brown for clothing and accessories, as well as reds, greys, and greens. I couldn’t for the life of me find a paint colour in any brand that was the right colour for the Elven cloaks. Those cloaks are something between a grey and a green, in a natural shade that is apparently impossible to acquire. I broke down and mixed a custom colour, two actually. The base colour was a 50/50 mix of dark grey and green paint, followed by a nuln oil wash, followed by a 50/50 mix of medium grey and green as a highlight. I opted to use natural stones for basing because I like the random and realistic look it adds. A quick spray with Testor’s Dullcote to seal it, and it was finished! This mini presented a couple of pretty significant challenges (replacing an arm, painting white, painting blonde hair, and painting Elven cloaks among them), but was very rewarding. It has only fueled my love for this range of models, looking forward to painting something else! 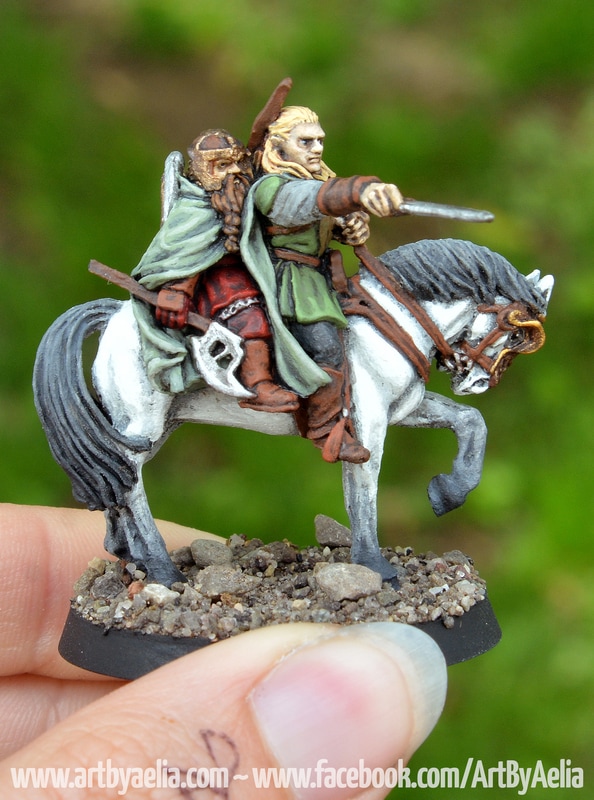 Thanks for Reading! |
AuthorThis is a blog for my artistic endeavours... as I experiment with new mediums, styles, and techniques, I'll post here. Archives
June 2020
Categories
All
|


 RSS Feed
All content is © Aelia Petro