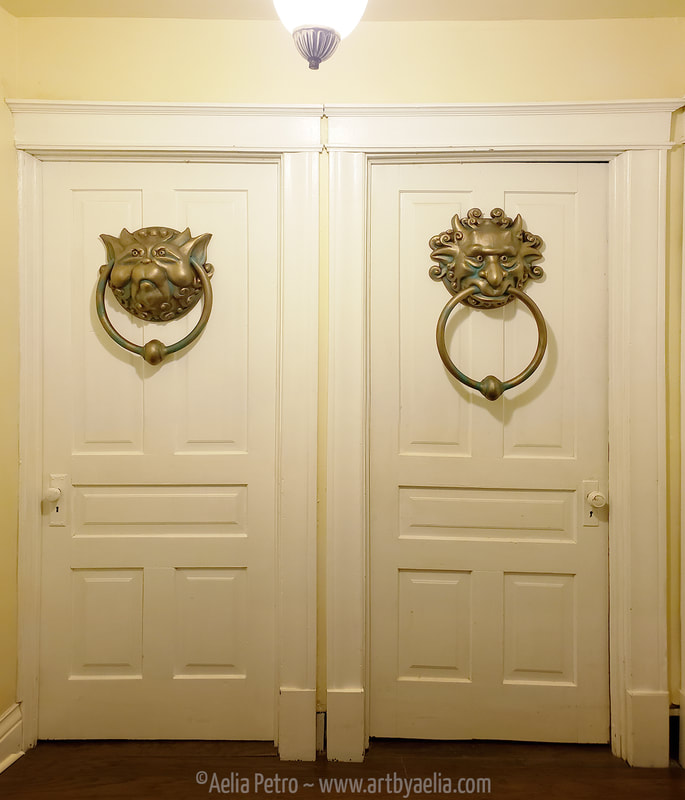
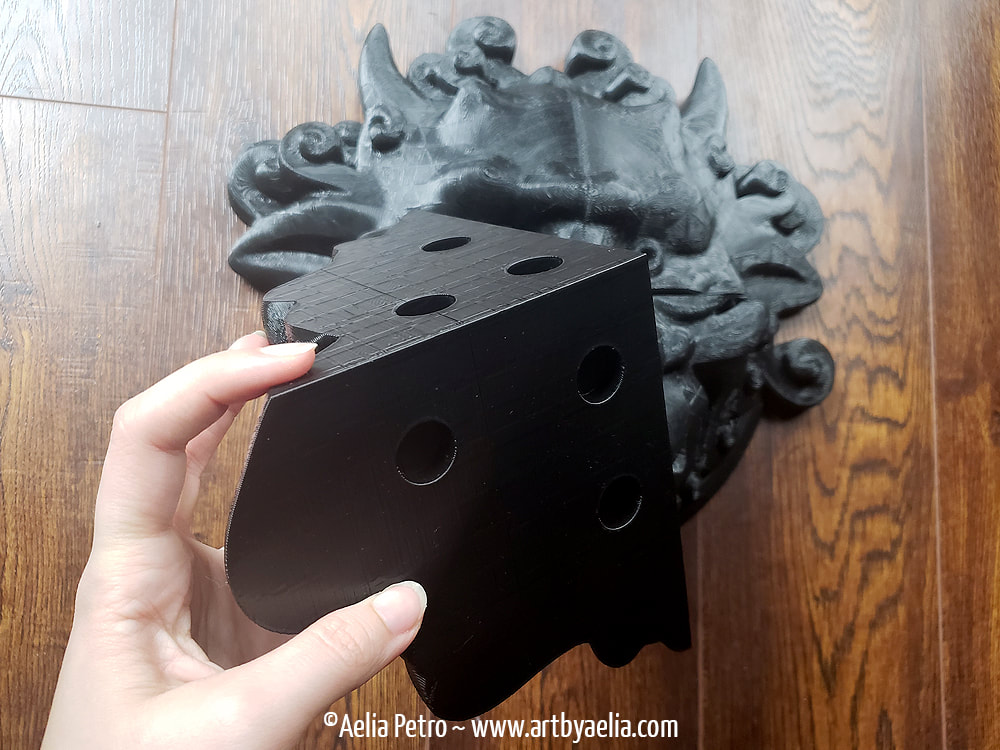
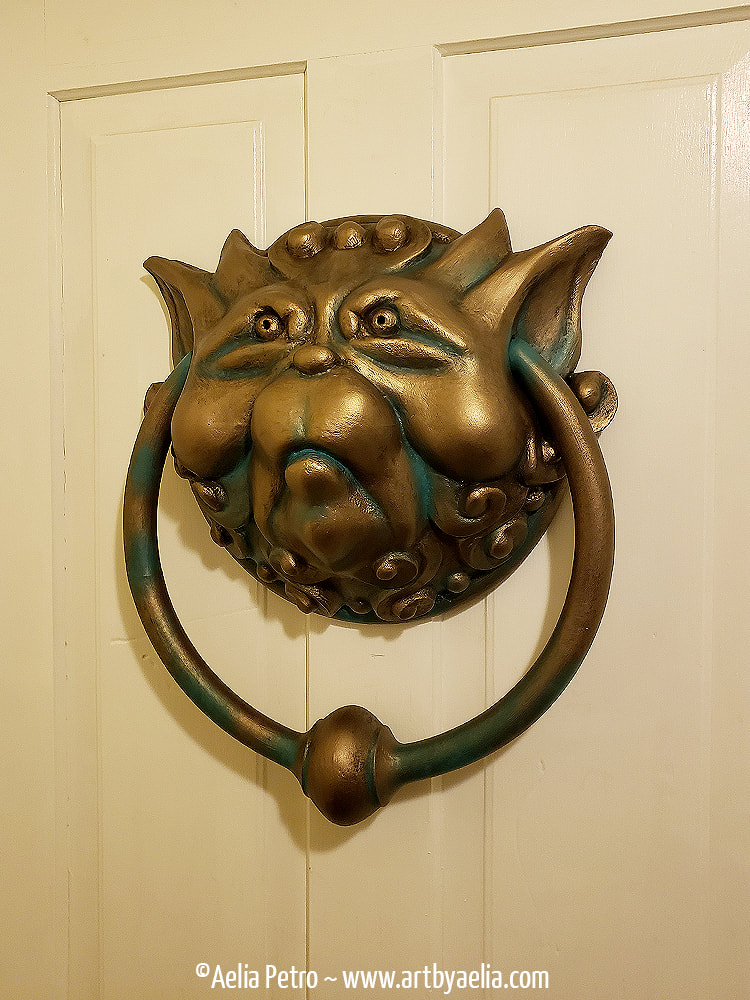
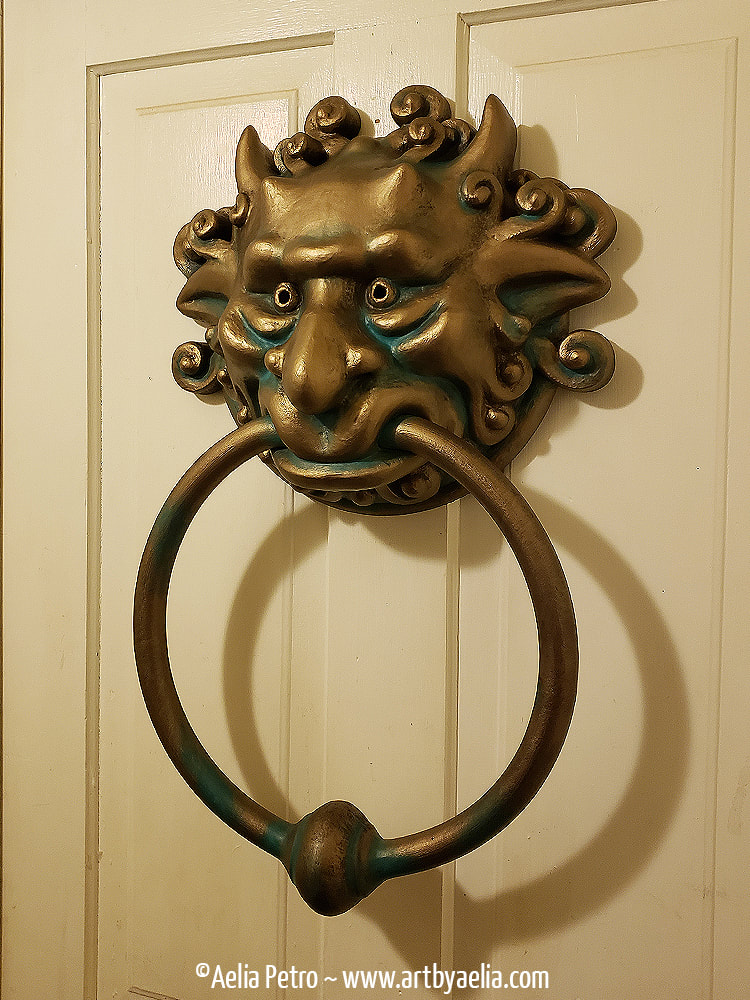
 Phew! This is a project that I'm glad to be finished. With no where near enough experience with 3D modelling, slicing, or printing, I embarked upon my most ambitious project to date. I just so happened to have two bedroom doors side-by-side, and a burning desire to adorn them with these knockers. I expected it to be a lot of work, but even so, I was surprised by what it took to get them done. Step 1: Editing the 3D filesMy starting point for this project was a pair of 3D files that I found online. These were sculpted by OnyxDigitalStudios on Cults3D.com. These were a good place to start, but they weren't accurate enough for my liking. I imported the files into ZbrushCore and started sculpting. You can see the original files (before) and my updated files (after) below. As someone with VERY little 3D sculpting experience, I was thrilled with how these turned out, especially the left knocker. I started with the right knocker, as it required less sculpting. I dropped the eyes and changed the shape of the forms around the eyes. I made the nose bigger and the nostrils much more prominent. I made the ears and horns bigger, and the lower lip more pouty. I also added additional swirly things next to the horns since they were missing in the original file. The left knocker required a lot of additional sculpting and editing. Basically the only things I didn't change are the bottom row of swirly things. I dropped his mouth down and made it more narrow. I also changed the forms on the chin to be more narrow. I made the cheeks a bit chubbier and changed their position on the face. I lowered the nose and made it rounder and more prominent. I made the ears much larger, and the shape more accurate. I changed the shape and size of his horns. The swirls on the sides needed to move closer to the head. The eyes were also lowered, and all the forms around them resculpted. After all of these changes were made, I exported the knockers as .obj files for further processing. Step 2: Preparing the 3D Files for PrintingThe files were set up for printing around 5" wide. I wanted them to be over 14" wide. Such large pieces would never fit on my Ender 3 printer. To print the knockers at full size, I had to break them into smaller pieces. The faces would need to be done in 4 pieces each. To facilitate assembly after printing, I built a rudimentary locking system with pegs. I couldn't figure out how to do this with Zbrush, so I opened the files in Meshmixer and processed these actions there. Each side-face has 3 holes, for a total of 12 holes and 12 pegs per face. 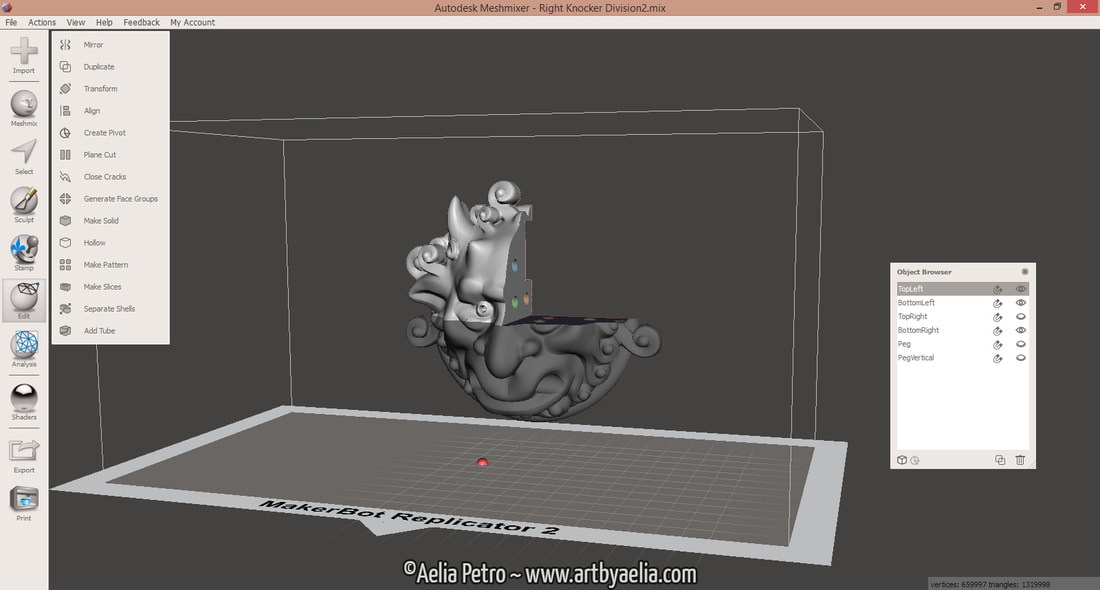 The rings had to be broken down even further than the faces. To best print them, they needed to be able to lay flat on the printer bed. This meant the minimum number of pieces for each ring was 2 (one for the front, one for the back), but given the massive scale of the finished pieces I needed to break each half further down into 4 pieces (for a total of 8 pieces per ring). Just like with the faces, I then created a locking system with pegs so that alignment wouldn't be a problem. The assembled pieces would require 28 pegs per ring. Each individual piece was then saved as an .obj file. 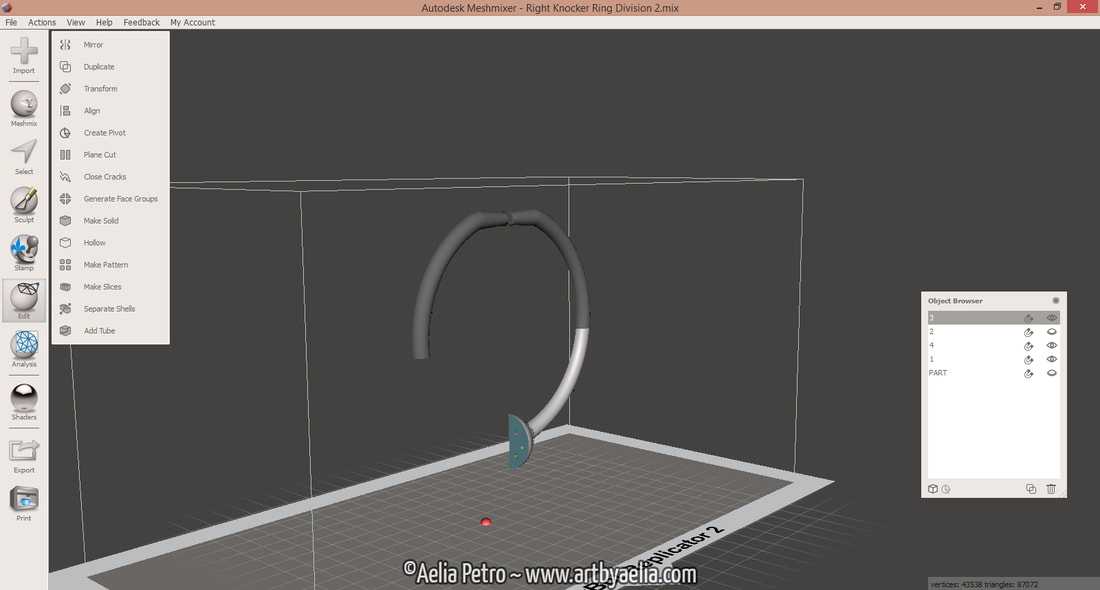 Step 3: SlicingIn order to print the 3D files, I had to convert them to gcode (the file format the printer reads). I did this in Cura. Cura is a great piece of free software for slicing models. I sized the pieces up to over 300% of their original size and then it was time to slice. These pieces were going to be huge, so to save printing time, I opted for a .3 layer height. At .3 each quarter was going to take around 10-12 hours (so the full faces would be 40-48 hours EACH). To improve the quality to .2 layer height would have more than doubled the print time. I personally don't like to run my printer overnight, so the .3 height was my best bet. I knew it would increase the presences of layer lines, and therefore increase the amount of sanding and filling required for a smooth finish. That's just the trade I chose to make. I opted to use 10% infill, because I didn't want the finished pieces to be too heavy (they are gigantic, and need to hang on a door). This also saved a lot of material, which was helpful since each face took an entire roll of filament. I sliced the pegs at .3 layer height as well, but upped the infill to 25% so that they'd be a bit stronger. Probably should have printed the pegs at 50%, but hindsight is 20/20, right? Step 4: PrintingI started with the right knocker, since he's my favourite. The printing process was pretty straightforward for the first quarter. It printed without any issues and really whet my appetite for the project. The second piece also printed simply and uneventfully. Step 4b: First HurdlePrinting the 3rd quarter I encounted my first problem. I ran out of filament! Having started the project with only a partial roll, I should have predicted this, but didn't keep an eye on it. I heard the printer click off, and ran to check out the finished piece, only to discover that it had run out of filament about an hour or two before the print ended... leaving exposed infill and an incomplete print. I didn't want to reprint the entire piece, because it would waste both time and material. Instead, I opted to print the missing part of the file. I chose an easy to recognize position on the print (where the cheekbone meets the cheek), and counted the number of layers that printed in that area. I used that to figure out the exact line on which the print had stopped, and then reimported the model into Cura. I sunk the model below the printer bed until only the layers that failed to print were on the bed's surface. Then I sliced it using the same settings as the rest of the face. 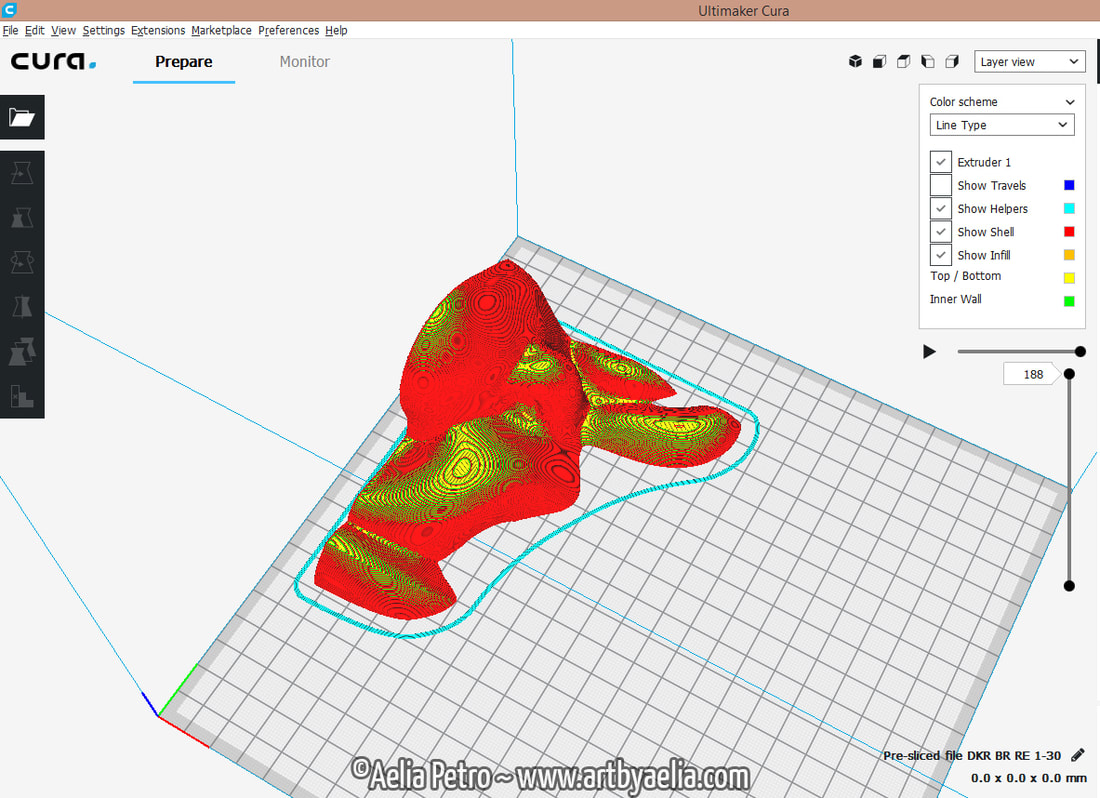 Below you can see the failed print (bottom right quarter), and the freshly printed patch (in my hand). Thankfully there was enough surface area making contact for the glue to hold it in place well. 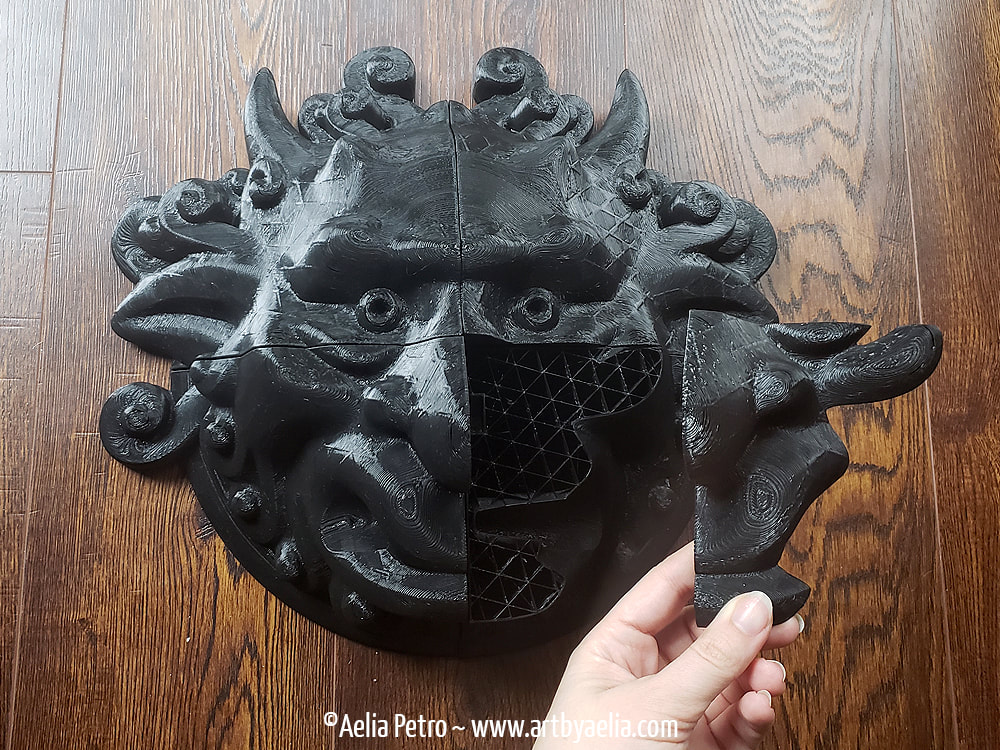
Step 5: SmoothingI knew this stage was going to suck, but I didn't appreciate exactly how much it was going to suck. The process:
Step 6: Printing Leftie... Until Catastrophe StrikesWhile working on gluing/sanding/filling/priming the right knocker, the printer was already at work printing the left knocker. This is when catastrophe struck. I had hoped that running out of filament would be my biggest issue on this print. Nope! I set up one of the face pieces to print and left it alone for a few hours. When I checked in on the print all I could see was spaghetti! I've never seen this kind of error before. After a momentary panic, I examined the printer and discovered the source of the problem. 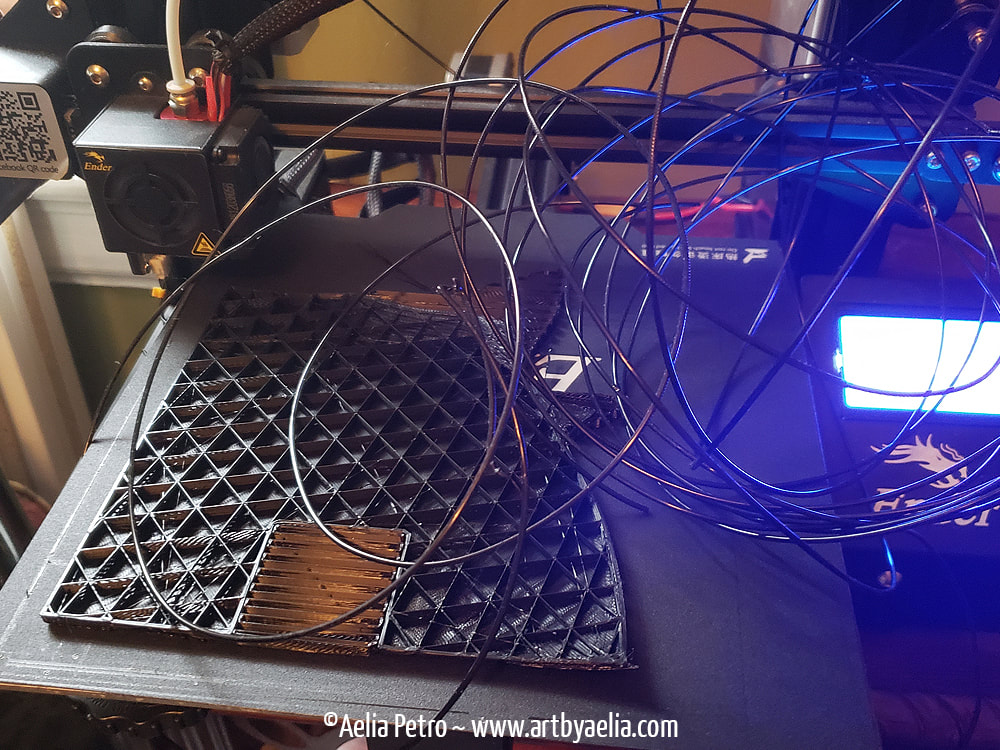 See the innocent looking thing below? Doesn't look too bad... but in reality, it was enough to ruin an entire print. The coupler broke, or more accurately, the ring lock on the coupler broke. This meant that as the filament was pushed from the extruder into the bowden tube, the tube was pushed along with it. Normally the ring lock would keep the tube secured, but this one refused to hold. I fed the bowden tube back into the coupler, and tried again. This time I watched it like a hawk, and saw the bowden tube pop out after less than a minute of printing. A friend suggested that cutting the tube may be enough to fix the problem (if the ring lock had been ok, it was possible that the wear on the tube from the lock could have been the problem, and that cutting off the worn part of the tube could have fixed it), but no such luck. Fortunately there is a 3D printing store about 40 minutes away, so I didn't have to wait for replacement parts to ship. I got a new coupler, and was back in business! 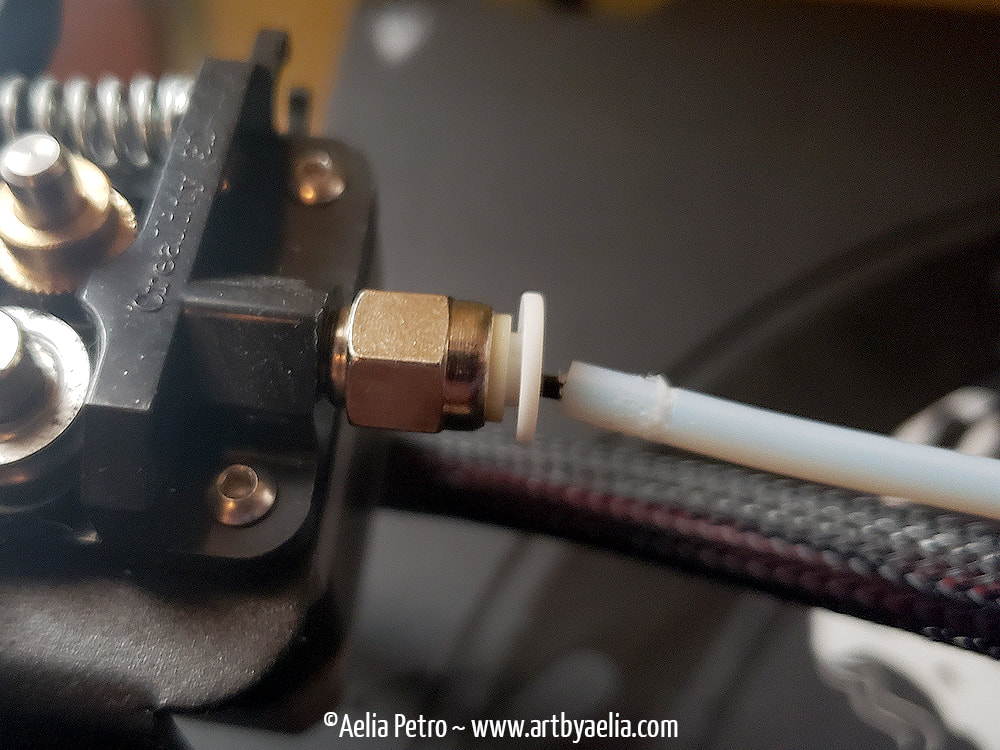 Once the coupler was fixed, the rest of the pieces printed without issue. 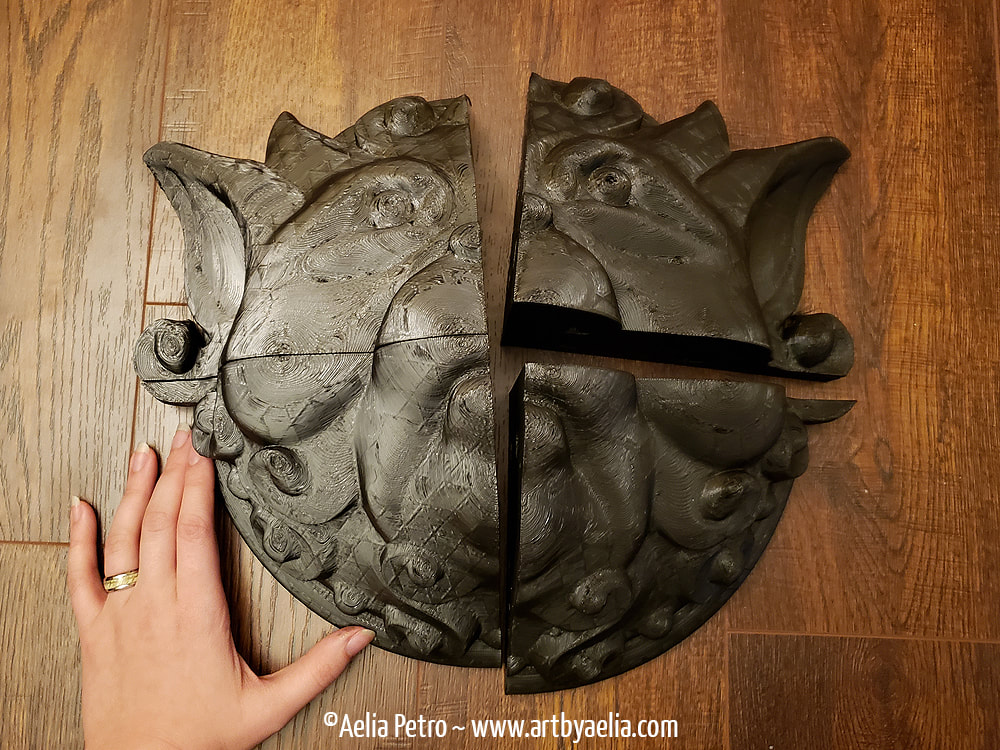 Here you can see the pegs lined up for assembly. The second knocker was glued together in exactly the same way as the first. 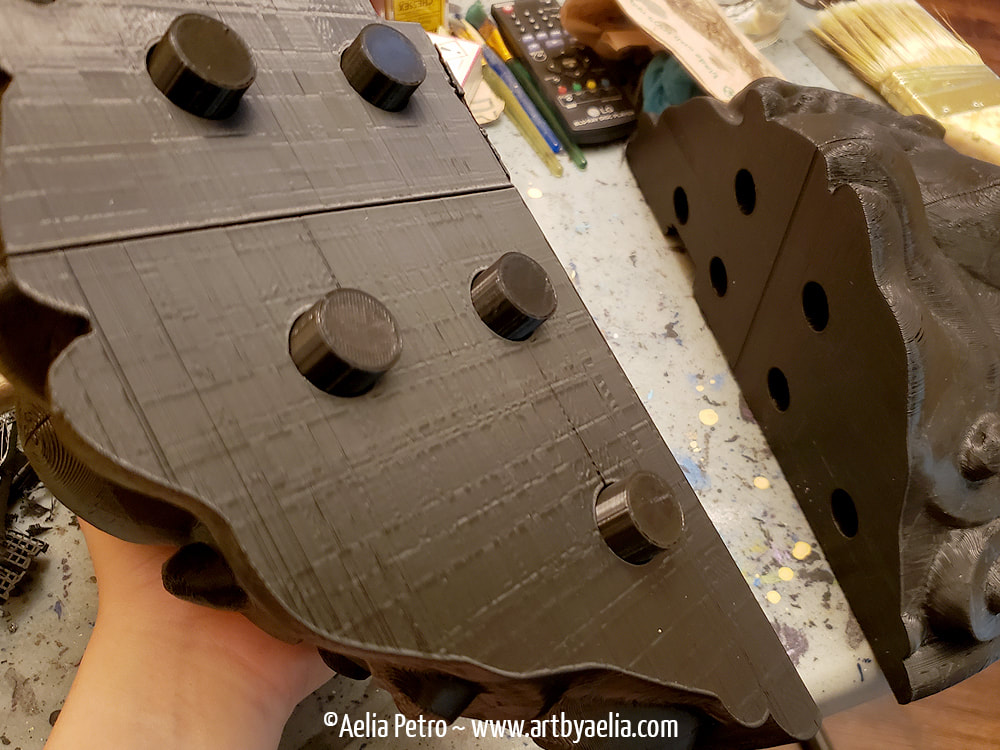 Step 7: Printing and Assembling the Rings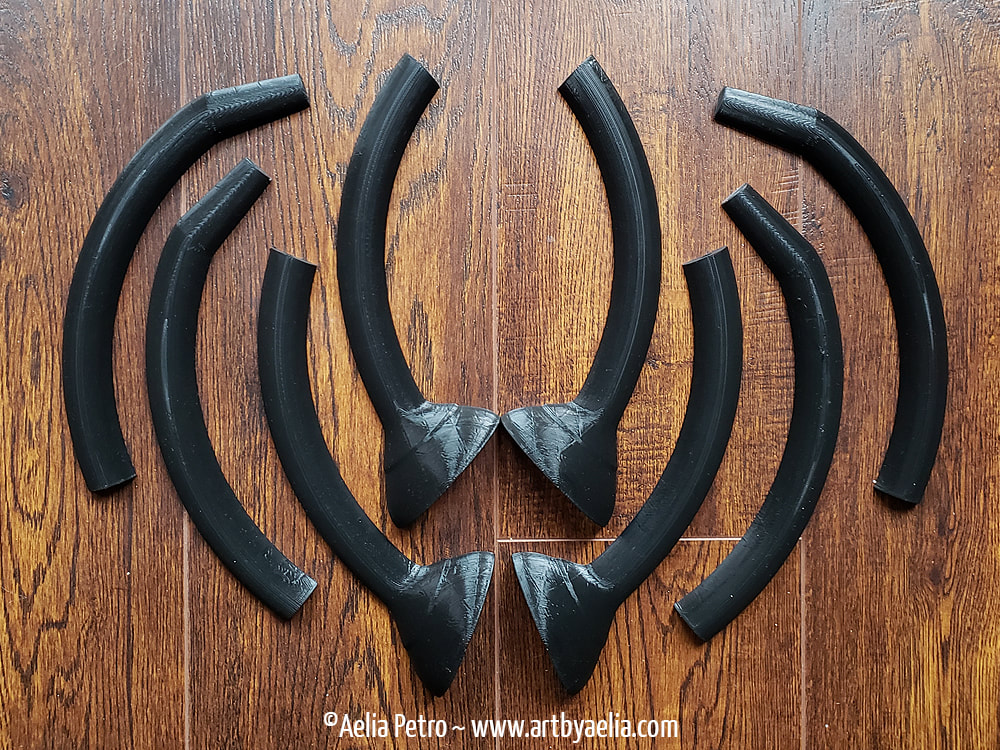 Next I printed the rings. The 8 pieces here come together to form the ring on the right knocker. 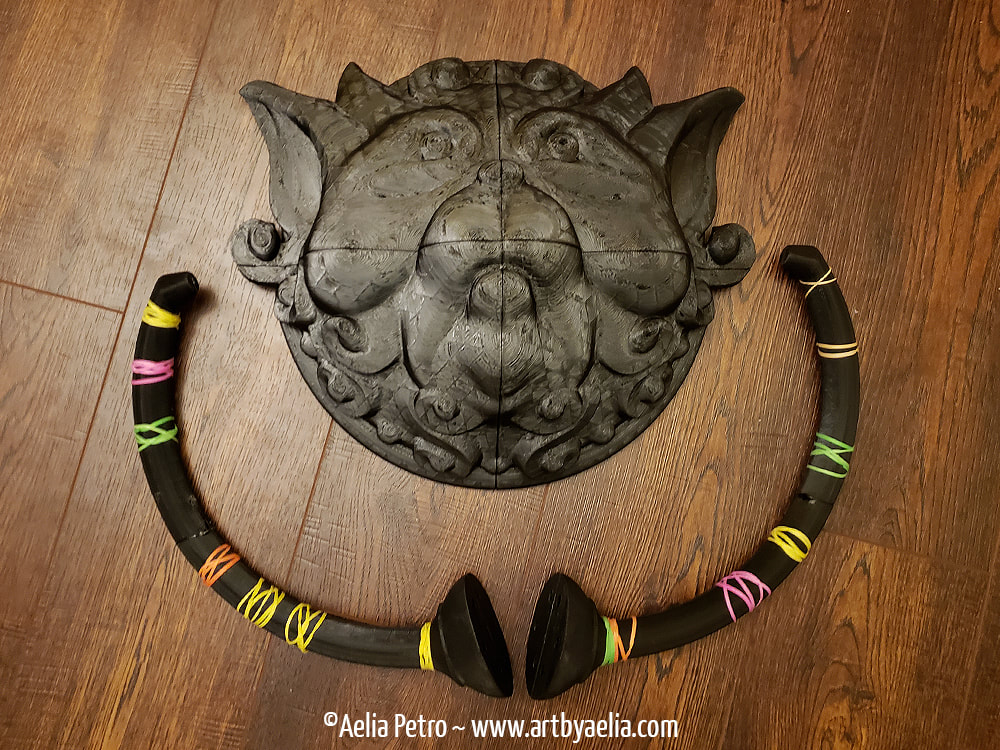 The rings were glued together the same way as the faces, using the peg/hole locking system. I didn't want to spend forever holding the pieces while the glue dried, so I broke out a bag of elastic bands and let them do it for me. I should note that I didn't glue the middle part of the rings together. Since the prints are ridged, they wouldn't be able to bend or flex for assembly. I didn't want to paint the faces with the rings attached (they were huge and unwieldy enough without the rings... and I also knew that as the rings bounced around during painting it would chip the paint), so I decided to do everything EXCEPT attaching the rings. That will be done later. Step 8: Smoothing Leftie and the RingsStep 9: Painting the Base Colour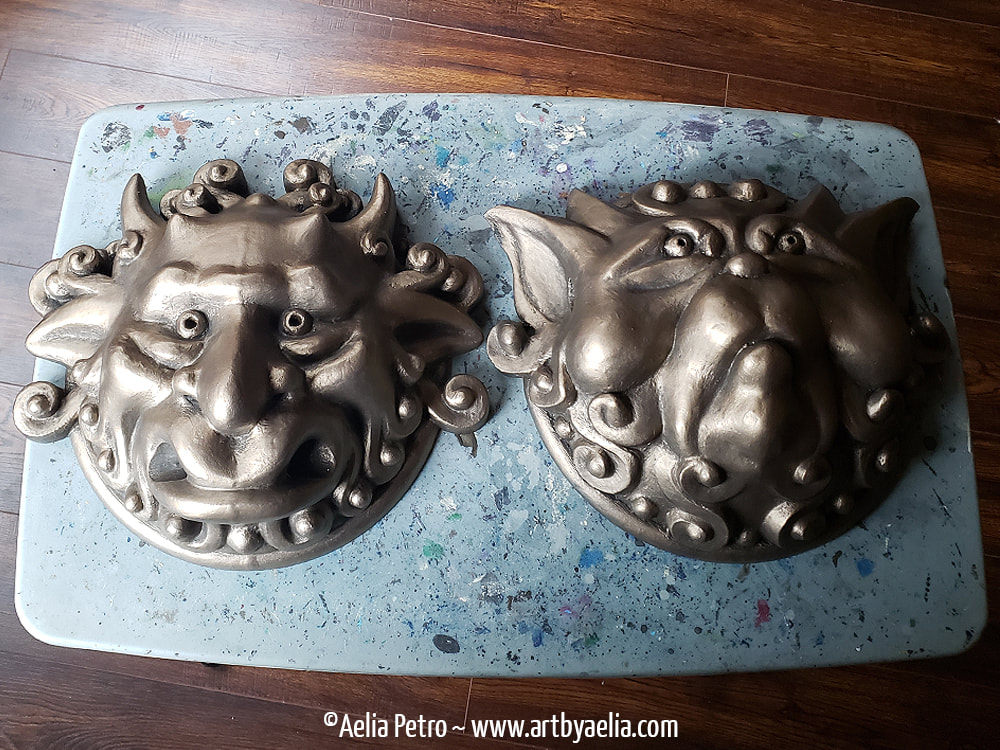 Next it was time to paint! I gave them a dark brown base colour, and then drybrushed them with bronze. I used a black wash to darken the crevasses and add some contrast. Then I drybrushed them with bronze again to brighten them up. I painted the rings at the same time, except for the middle bit which was yet to be glued. Step 10: Affixing the Rings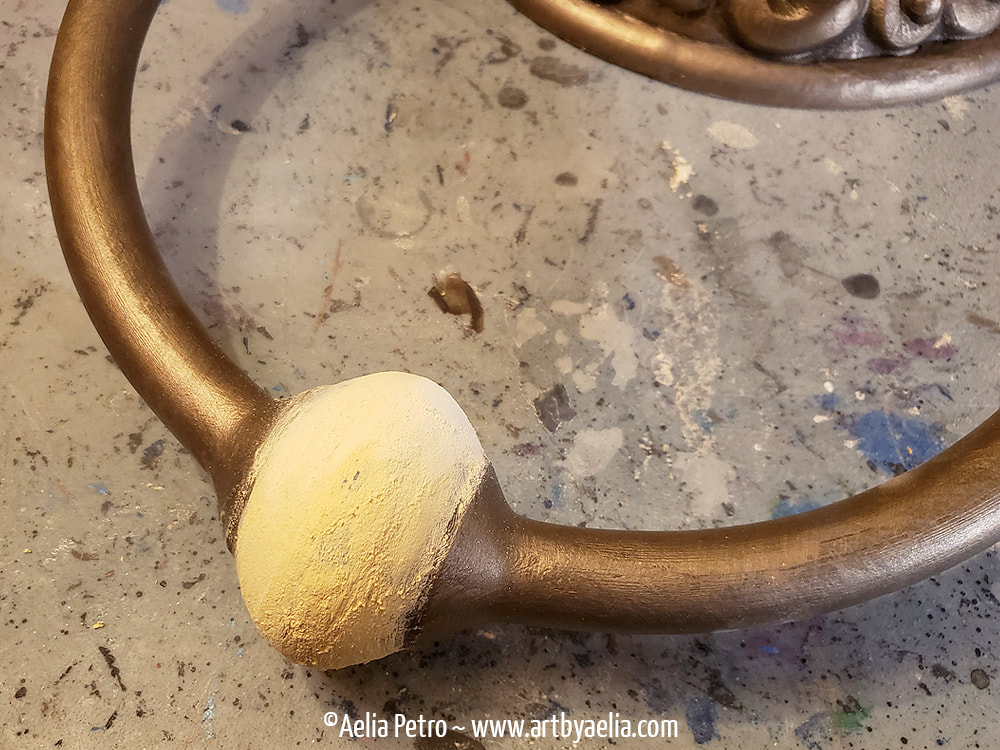 I put the rings in place (one through Rightie's mouth, and one through Leftie's ears), inserted the guide pegs, and then glued the center part of the rings together. This left a rather large gap which then needed to be filled and sanded. Shown above prior to sanding. After sanding, I painted the same sequence of colours as I had done elsewhere so that the center matched the progress everywhere else. Below you can see the knockers assembled, including completed rings, prior to adding the patina. 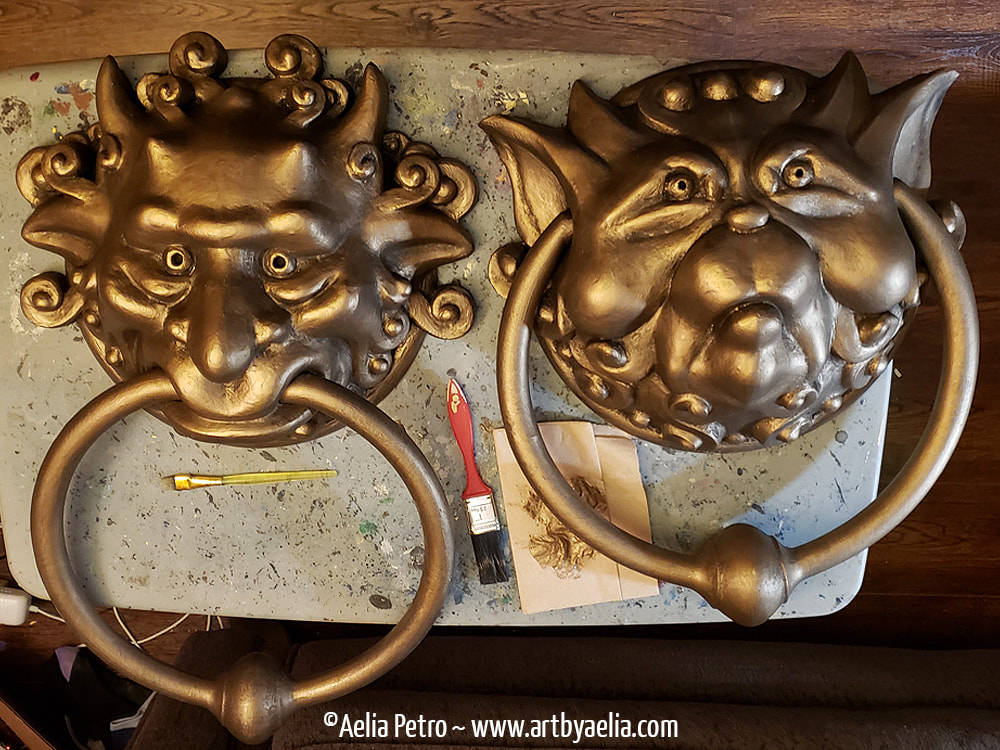 Step 11: Adding the PatinaThe Knockers in the movie were weathered and aged including a lovely patina. I thought of a hundred different complicated ways of doing this, and then rewatched the movie (for the 1000th time or so lol). On the bluray it was clear that the approach was fairly simple, so I decided to keep it that way. I used two acrylic paints, carefully applied to give the impression of patina. In the photo below you can see the work in progress. I used a relatively large brush, and dabbed off the excess paint on my hand. I always find it easier to gauge how much paint is on the brush using my hand. 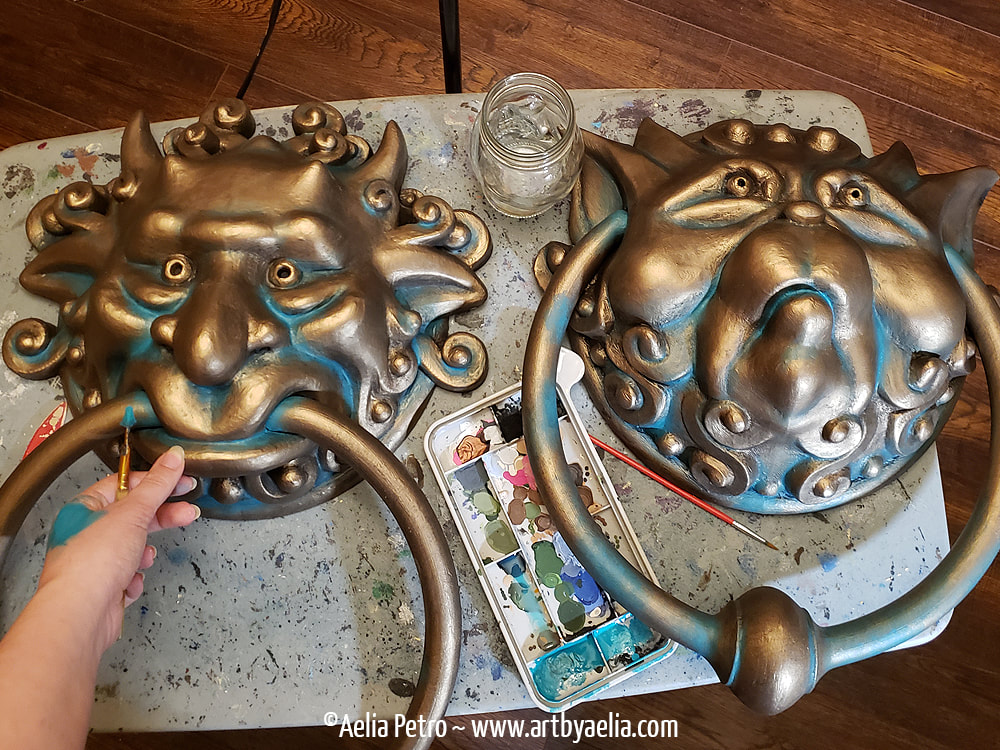 Step 12: HangingI incorporated a small indent on the back of the faces when I split the pieces apart in Meshmixer... but didn't really have a plan as to how they were going to hang. I wish I had spent more time figuring out how I planned to actually get them hung up before printing. Leaving it till the end was a mistake. My long-suffering boyfriend was kind enough to help me make sense of the mess I'd made. Because the faces have only 10% infill, they couldn't have hooks drilled into them for picture hanging hardware (it wouldn't be secure at all, and would likely break and fall). The little nook I carved out of the back of the model wasn't large enough to fit most hangers. Ultimately we wound up finding some L shaped screws, which were screwed into the door. Some Macgyver shenanigans with a metal plate and some dremelled holes ultimately got the job done. The backs resemble a crime scene, but I don't mind since they're exactly where I want them, and I'll hopefully never see the back again lol
 That's All Folks!Cost BreakdownFinancial costs:
Credits
Original 3D files credited to OnyxDigitalStudios on Cults3D Edited 3D files sculpted by Aelia Petro 3D printing, post-processing and painting by Aelia Petro This project is completely not-for-profit. It is entirely for fun.
0 Comments
Your comment will be posted after it is approved.
Leave a Reply. |
AuthorThis is a blog for my artistic endeavours... as I experiment with new mediums, styles, and techniques, I'll post here. Archives
June 2020
Categories
All
|

 RSS Feed
All content is © Aelia Petro